Instructions by
monstershop
T-Mech Mortice Jig This guide provides step-by-step instructions for assembling components and using a mortice jig to mortice wooden doors. It includes preparation, assembly, and usage instructions.
Product Information T-Mech Mortice Jig Perfect for locksmiths, joiners and tradesmen, this Mortice Jig is capable of cutting the body
and faceplate of locks into wooden doors in as little as five minutes. Robust and precise with
self-centring housing and fitted depth collar, this T-Mech Mortice Jig provides a perfect,
professional finish every time.
It includes six cutters of different size (2 x 19mm, 2 x 22mm, 2 x 25mm), door clamps, stops,
guide blocks, and drive shaft all contained within the handy carrying case, so you’ll only need a
power drill to begin. This T-Mech Mortice Jig fits doors of 30mm-85mm in depth.
NOTE: The T-Mech Mortice Jig is designed to cut wooden doors. With alternative cutters, it
can also cut aluminium doors. These cutters are not included
Product Specifications SKU 24373 Dimensions (H x W x D) 43 x 20 x 15 cm Weight 3kg Material Steel rods, cast-alloy housing, carbide steel cutters Standard shaft fitting Locks of up to 100mm Door fitting Doors between 30mm-85mm Required components Power drill with 13mm chunk running at 2000-3000rpm Cutters included 19mm (x2) 22mm (x2) 25mm (x2)
GPSR Information UK
Monster Group UK Limited, Monster House
19-23 Alan Farnaby Way,
Industrial Estate Sheriff Hutton,
York
YO60 6PG
Rana Harvey, Monster Group UK Limited,
Monster House
19-23 Alan Farnaby Way,
Industrial Estate Sheriff Hutton,
York
YO60 6PG,
England,
+441347878880
EU
Monster Group BV,
Van Heemskerckweg 28A & B,
Venlo 5928LL
Netherlands
+441347878880
Rana Harvey,
Monster Group BV,
Van Heemskerckweg 28A & B,
Venlo 5928LL,
Netherlands,
+44134787888
Safety Please read through the safe working practice to ensure prevention of injury or damage to the device.
Do not use this Mortice Jig unless you have fully read and understood the instruction manual.
Wear safety boots when commencing the mortice jig process.
Always wear safety gloves and goggles whilst
Ensure the working area is clear from children and animals.
Do not allow children or inexperienced users to operate a drill or this mortice jig.
Do not use the mortice jig for anything other than its intended purposes.
When operating, ensure the jig is securely fitted to the intended piece of wood.
Store out of reach of children.
Inspect the product for signs of wear and damage before and after every use. If you notice damage, do not
Do not attempt to repair the tool yourself. Only a qualified professional should repair this tool.
Best Practices It is recommended you consult ‘Assemble Components’. Familiarise yourself with all the parts prior to assembly. For best results, we recommend you read and watch guides and undertake research before proceeding.
Knowledge The cutters included are carbide-tipped. Carbide-tipped cutters can be sharpened using a diamond whetstone. When sharpening, only use water as a lubricant. Do not use oil.
GPSR Information UK
Manufacturer: Monster Group UK Limited, Monster House 19-23 Alan Farnaby Way, Industrial Estate Sheriff Hutton, York YO60 6PG, England.Person Responsible: Rana Harvey, Monster Group UK Limited, Monster House 19-23 Alan Farnaby Way, Industrial Estate Sheriff Hutton, York YO60 6PG, England. +441347878880EU
Manufacturer: Monster Group BV, Van Heemskerckweg 28A & B, Venlo 5928LL Netherlands.Person Responsible: Rana Harvey, Monster Group BV, Van Heemskerckweg 28A & B, Venlo 5928LL, Netherlands. +441347878880
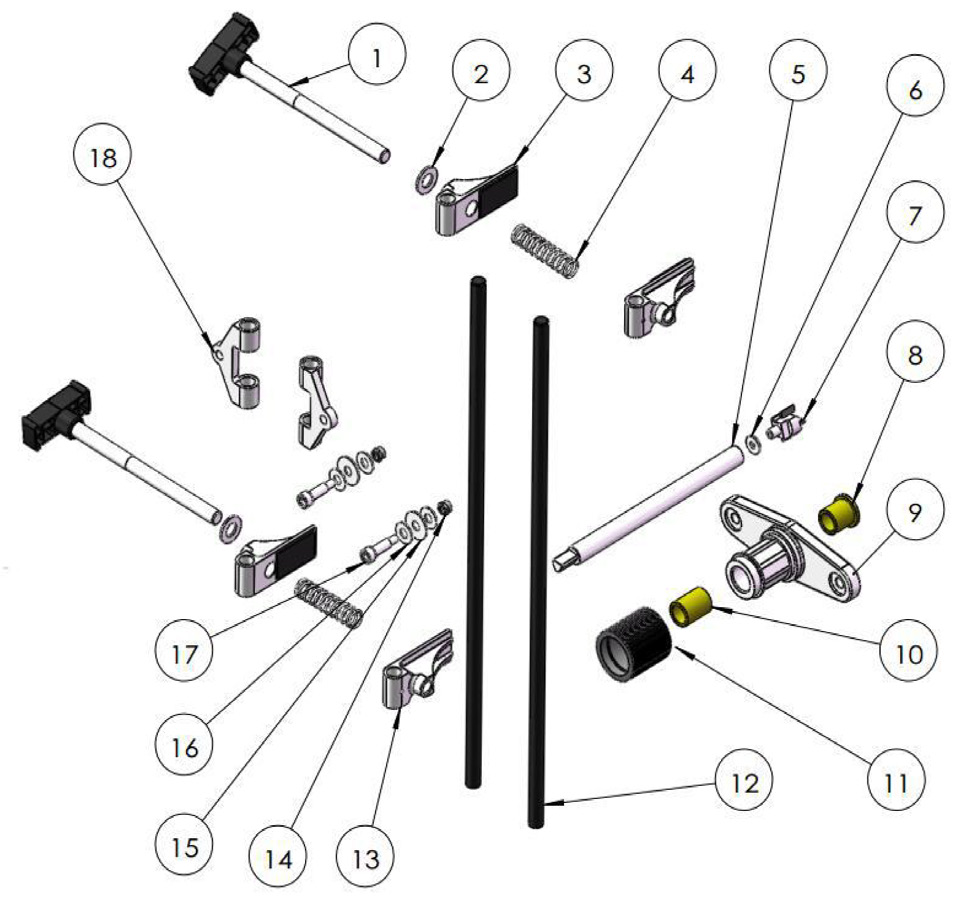
Parts 1 Adjustment Bolt and Handle
2 Washer
3 Clamp
4 Spring
5 Shaft
6 Washer
7 Cutter
8 Outer Sleeve
9 Rod Guide
10 Inner Sleeve
11 Depth Stop
12 Guide Rod
13 Clamp
14 Nut
15 Washer
16 Washer
17 Screw
18 Guide

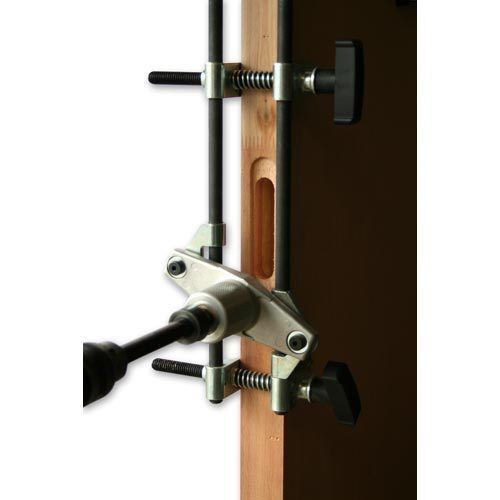
1. Upper Clamp
Slide the Guide (4) onto the Main Frame (3) as in Image 1.

Slide the Clamp (1) onto the Main Frame (3) as in Image 2.

Place the Shaft (2) through the Guide (4) before attaching the cutter piece and before you attach the mortice jig to the door, as in Image 3.

Use the lock as a template to mark off the top and bottom edges of the lock body and faceplate. A and D mark the faceplate, B and C mark the lock body.

Select an appropriate cutter that suits the depth of the door and lock body. Screw the cutter onto the shaft.
Place the mortice jig to the door edge. Position the jig so that the cutter can move no lower than 5mm below C. Tighten the lower clamps.
Position the jig so that the cutter can move no higher than 5mm above B. Use the provided clip to stop the cutter from moving beyond this point. Tighten the upper clamps.

Place the lock between the guide and the depth stop. This sets the depth to which the cutter will enter the door. Tighten the depth stop with a grub screw.
DO NOT OVER-TIGHTEN.
CAUTION: Grease the shaft before you continue. If you do not grease the shaft, it will expand in heat and become jammed. Equip PPE and connect power.

Connect an electric drill to the shaft. Place one hand on the guide and feed the cutter into the door. Use a high speed setting on the drill. Then disconnect power.

Use the spanner provided to unscrew the cutter whilst holding the depth stop. Take care as this jig may be hot.
Now that you have cut the hole for the lock, you need to cut a shallower hole for the lock faceplate so that it is flush to the door. Select a larger cutter that is the same width as your lock faceplate. Push the shaft through the housing and carefully screw the cutter into place until tight.
Place the lock faceplate between the guide and the depth stop to mark the depth you will cut.

Re-position the jig so that the cutter can move within 5mm of position A and within 5mm of position D. Ensure the cutter cannot cut beyond positions A or D.
Carefully cut the recess so that the faceplate can sit within the door. You will need to square off the recess using a hammer and chisel.
NOTE: The T-Mech Mortice Jig can be used in various other situations. These include morticing
All maintenance should be carried out by a qualified professional.
The cutters included are carbide-tipped. Carbide-tipped cutters can be sharpened using a diamond whetstone.
Screw the cutter onto the shaft. You should only ever cut the flat side, never the profile side. When sharpening, only use water as a lubricant. Do not use oil.
Glide the cutter along the stone with light to mild pressure. Try to repeat the same number of strokes on both sides. This should be between 5-30 strokes. You can find useful maintenance tips online.
A: Tighten the nuts fixing the sliders on the guide. Do not over-tighten. Ensure the frame and
A: This may happen over very long periods of time. Contact our Customer Support team and we
A: Gently loosen the sliders on the guide housing and spin around. Re-tighten.
A: Carefully attach a packing strip or wooden block to the side of the door. Measure up and fit
A: This is probably caused by a build-up of wood dust trapped inside the parts. Pull off the
A: We recommend you mark out and cut all the lock bodies first. Nip the spring clip on the