This guide provides step-by-step instructions for assembling components and using your Cordless Horse Clippers 12V.
Product Information
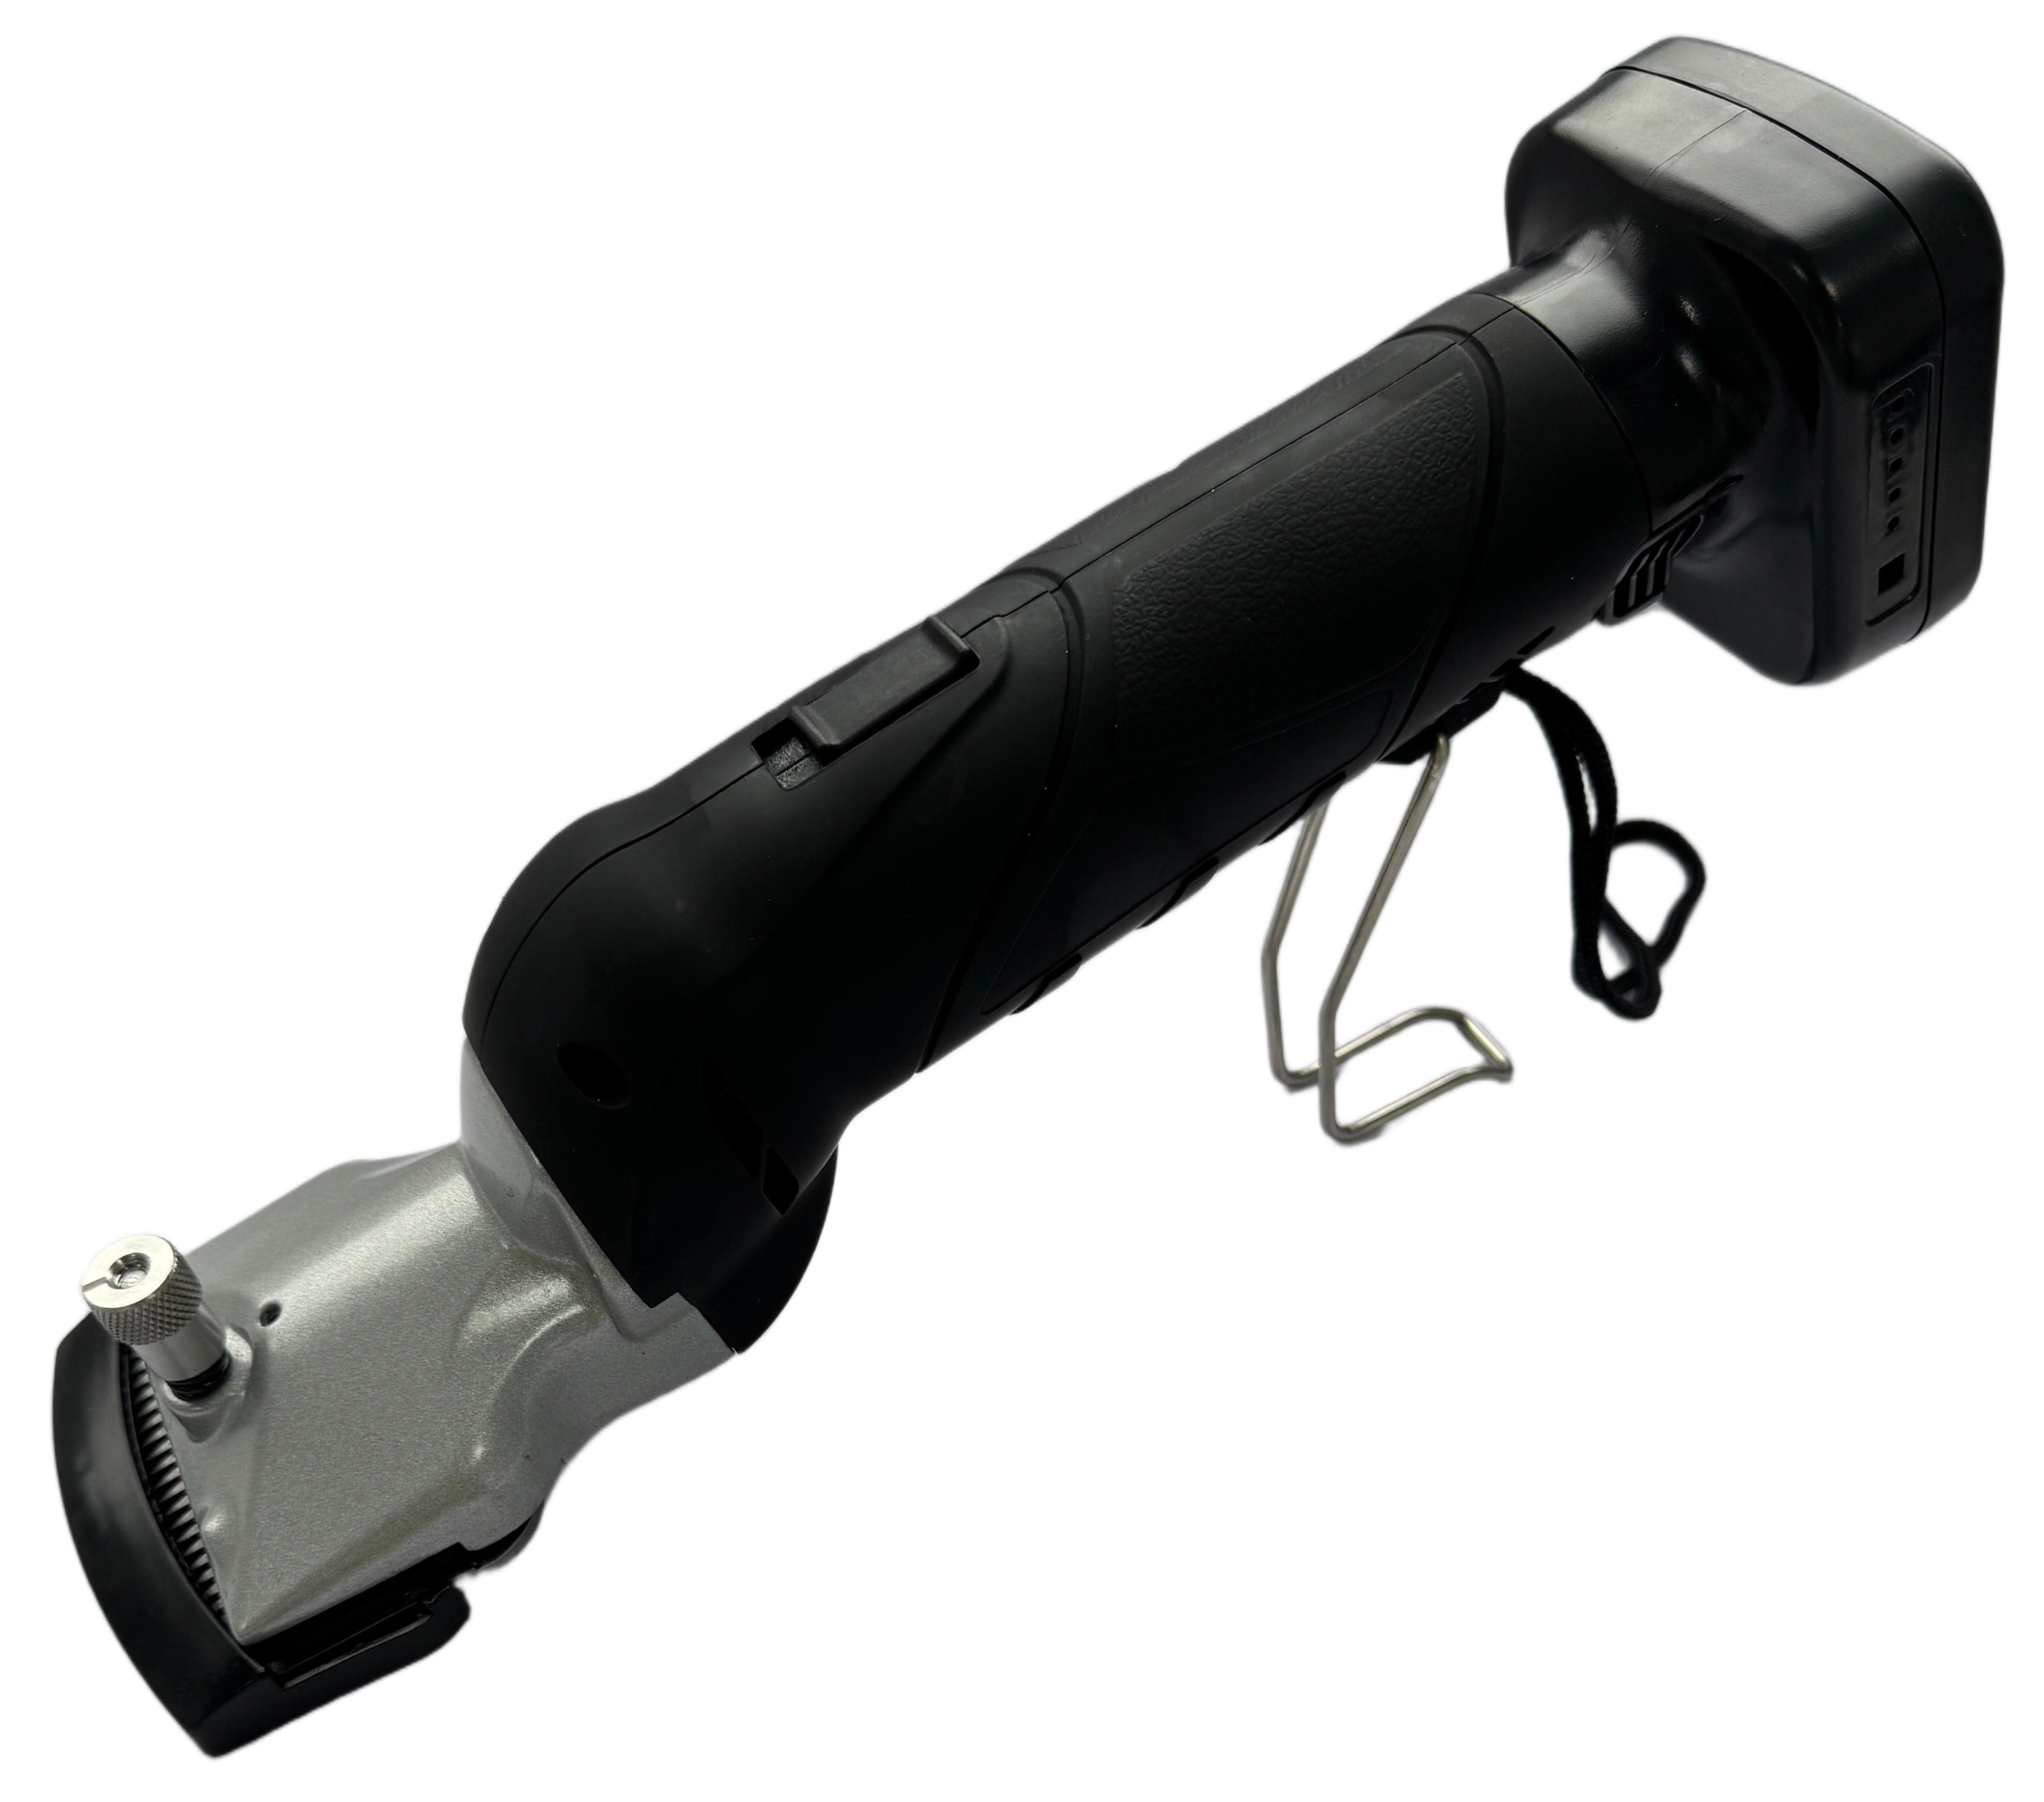
Cordless Horse Clippers 12V - Black
Designed for reliable, professional grooming, this cordless horse clipper delivers powerful 180W performance combined with smooth, low-noise operation below 70dB for a more comfortable experience for both horse and handler. Featuring a high-efficiency 2500RPM motor and an A2 Lister-type clipper head, it ensures precise and consistent results across a range of coat types. The lightweight, ergonomic design (approximately 1.3kg with battery) enhances control during extended use, while the 4000mAh battery provides up to 4 hours of working time from just a 2-hour charge. Supplied with essential accessories and compatible with EU plug systems housed in a BS plug format, this clipper offers convenience, durability, and dependable performance for everyday grooming needs.
SKU
217667
Power Output:
180 W
Motor Speed:
2500 RPM
Noise Level:
Below 70 D
Clipper Head:
A2 Lister-type
Battery Capacity:
4000 mAh
Working Time:
Approx. 4 Hours
Charging Time:
Approx. 2 Hours
Operation:
Cordless
Weight (with battery):
1.3 KG
Total Weight (per unit):
Approx. 1.50 KG
Power Supply / Plug:
EU plug with BS plug housing
Key Features:
Super quiet, low vibration, ergonomic, easy to handle, suitable for extended grooming sessions
Dimensions:
43 x 14 x 33 cm
Parts
Screw Driver
Oil Bottle
Charger
Blades
Batteries
Cleaning Brush
Storage Case
Clipper with Clipper Head
1. Setting the Clipper Blades with the Tension Knob
Before clipping:
With the machine switched off, tighten the tension knob until the first resistance is noticeable. Then adjust the tension knob a further 1/4 turn.
During clipping:
The patent clipping system guarantees long-term adjustment. When the blades cease clipping adequately the tension knob should be tightened a further 1/4 turn. If this adjustment does not produce the desired result, the clipper blades should be resharpened.
The clipping system works with much less pressure having to be applied than with traditional animal clipping machines. Care should be taken, to ensure that the blade tension is not set too high. Slightly adjust the blade tension from time to time during clipping.
Hair may collect between the clipper blades if they are insufficiently tensioned at the start of clipping. This will have an adverse effect on further clipping progress or make it quite impossible. If this happens, the clipper blades must be disassembled, cleaned, oiled and re-fitted.
2. Lubrication
Having a thin layer of oil on the front and back blades is essential for good clipping results and so as to increase the life of the machine and its clipper blades. All other moving parts in the clipper head must also be well-oiled. Place a few drops of oil on the clipper blades and pour some into the lubricating holes provided on the clipper head.
Only use our special oil or a paraffin oil meeting the ISO VG 15 specification. This oil is nontoxic and produces no irritation on contact with the skin or the mucous membranes. This paraffin oil degrades to some 20% after 21 days (CEC-L-33-T-82).
Poor lubrication is the most frequent cause of unsatisfactory clipping results. Inadequately oiled clipper blades will overheat, leading to reduced blade life.
The clipper blades and clipper head must be adequately lubricated during clipping (at least every 15 minutes) so that they do not run dry.
3. Switching On / Off
The pressure switch has two positions. When the switch is first pressed in, it locks and the machine is switched on. To switch the machine off, press the switch again.
Always use the pressure switch to switch the machine on and off. Check the switch position before inserting the battery; the machine must be switched off.
4. Charging the Battery
New batteries or those which have not been used for a long time, and/or those at temperatures below 10°C will not yet be at full capacity. This is because of the way the battery functions and does not indicate a fault. Full working capacity will be reached again after the battery has been discharged and recharged a few times.
Plug in the mains plug and insert the battery into the charger from above without using any force. Check for clean contact surfaces/charging cavity.
If, after clipping, the battery becomes heated by external influences (sunlight, ambient temperature or the like), it may be that the battery cannot be charged (the red charging light will not light up). If this happens, let the battery cool down prior to charging.
The red control light will be lit during the charging process. If the control light does not light up, check all contact surfaces and charging apertures for dirt and foreign bodies. If the control light still does not light up, a malfunction has occurred which can only be rectified by a specialist.
As soon as the battery is fully charged (charging time approx. 1 1/2hour), the green control light will light up and the charger will switch to “trickle charge”.
Once charging is complete, hold the charger firmly with one hand and pull the battery out with the other. Disconnect the charger from the mains.
5. Inserting and Removing the Battery
Check the contact points on the machine and the battery for foreign bodies and dirt.
Switch the machine off before inserting or removing the battery.
Fully insert the battery into the shearing machine and clamp it tight carefully with the snap closure. Do not apply force to insert the battery. The battery should slide easily into the machine; if not, there is a fault.
To remove the battery, unlock the snap closure and pull the battery out of the machine.
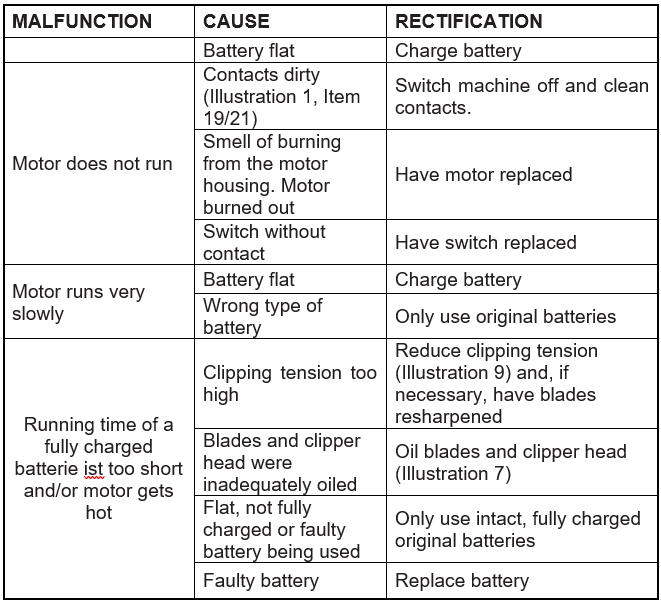
6. Malfunctions
The machine possesses an electrical overload and total discharge protection. If the machine switches itself off during operation, this may be due to one of the following causes:
1. The clipping tension has been set too high and/or the blades are insufficiently oiled. Reduce the clipping pressure and oil the blades regularly so that they do not run dry. If you still do not get a satisfactory clip, have the clipper blades resharpened by a specialist workshop. 2. The clipper head is jammed. Remove the blockage. 3. So as to protect the battery from a damaging total discharge, the machine will switch itself off when the battery is flat. The battery must then be recharged. Switch off the machine in the event of 1, 2 or 3. After rectifying the cause, the machine can be used again as usual.
See the list of malfunctions in the “Repairs” section, for the rectification of malfunctions.
7. Servicing
The charger is maintenance-free. Before cleaning, pull the charger’s plug out and remove the battery from the machine.
Cleaning Cleaning the Clipper Head and Clipper Blades:
After clipping, remove all of the oil from the machine by rubbing it down with a dry cloth and carefully clean the clipper head and clipper blades with a dry brush. Then oil the parts to prevent rusting. Even the smallest rust spots on the blades can adversely affect clipping or make it completely impossible.
Cleaning the Charger and Battery:
Only clean the charger and battery with a dry cloth or a cloth slightly dampened with soapy water (not dripping wet).
Do not use any solvents since they can damage the charger and the battery.
Fitting the Clipper Blade:
A pair of clipper blades consists of a back blade and a front blade. When fitting the blades care should be taken to ensure that the correct surfaces come to rest against each other. The blades are fitted as follows:
1. Loosen the tension knob and take out the blade screws, then remove the old blades. 2. Ensure that the new clipper blades are clean. Particular care should be taken to ensure that the ground surfaces are free of dirt; if not, even newly ground clipper blades will not clip satisfactorily. 3. Place the new upper blade in the guide orbit of the driving carrier; then place a few drops of oil on the ground surfaces. Now, fix the new back blade between the loosened blade screws. 4. What is now important is that the blades are against each other in such a way that the ground surface of the back blade projects approx. 1.5 -2.0 mm beyond the tips of the front blade.
Re-sharpening the Clipper Blades:
Only work with sharp clipper blades.
Replace blunt blades or those with missing teeth.
Proper resharpening can only be done with a special machine and by a trained technician contactable through your service centre.
Storing the Clippers:
Only store the machine and charger in a dry place and in the case supplied.
Do not switch on the machine if you suspect any liquid has got into it. There is then a risk of an electric shock or short circuit.
Hand the clippers into a service centre.
Make it a habit to store the machine between use, making sure it is stored well-cleaned, oiled and with tension slackened off, in its storage case, in a clean, dry place, out of the reach of children.
8. Repairs
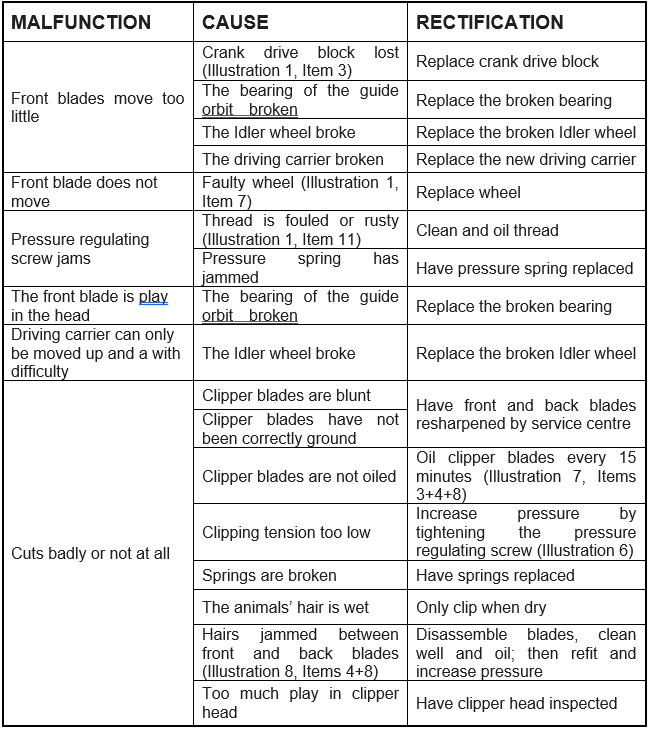
The attached photos show a table with possible malfunctions, causes and rectifications.
Actions to be taken to rectify malfunctions are indicated in the “Rectification” column of the malfunction lists. Those rectification notes printed on a dark background may only be carried out by an authorised service centre.
This appliance is not intended for use by persons (including children) with reduced physical, sensory or mental capabilities, or lack of experience and knowledge, unless they have been given supervision or instruction concerning use of the appliance by a person responsible for their safety.
Children should be supervised to ensure that they do not play with the appliance.
If the supply cord is damaged, it must be replaced by the manufacturer, its service agent or similarly qualified persons in order to avoid a hazard.
9. Environmental Protection and Disposal
The owner has a duty to dispose of the clipper blades as well as of the clipping machine properly at the end of its service life.
Faulty or used-up batteries must be handed over to the sales point or to an official disposal centre.
Please observe your relevant national regulations.
Please hand the machine to a service centre or to a specialist electrical dealer in your vicinity for disassembly.
10. Troubleshooting
Please read through the guide below if you have any issues or faults with your device. The information covers and resolves the majority of frequently asked questions.
Q: There are parts missing from my order. A: If there appears to be any part missing from your package contact our Customer Support team via the details on the Contact Us page within 7 days of receipt.
For all other issues please contact our Customer Support department via the details on the Contact page.