
Monster Manuals
Brand

KuKoo Kebab Carving Machine
This guide provides step-by-step instructions for assembling components and using your KuKoo Kebab Carving Machine.
instructions.monstershop.co.uk
KuKoo Kebab Carving Machine
This guide provides step-by-step instructions for assembling components and using your KuKoo Kebab Carving Machine.
Product Information
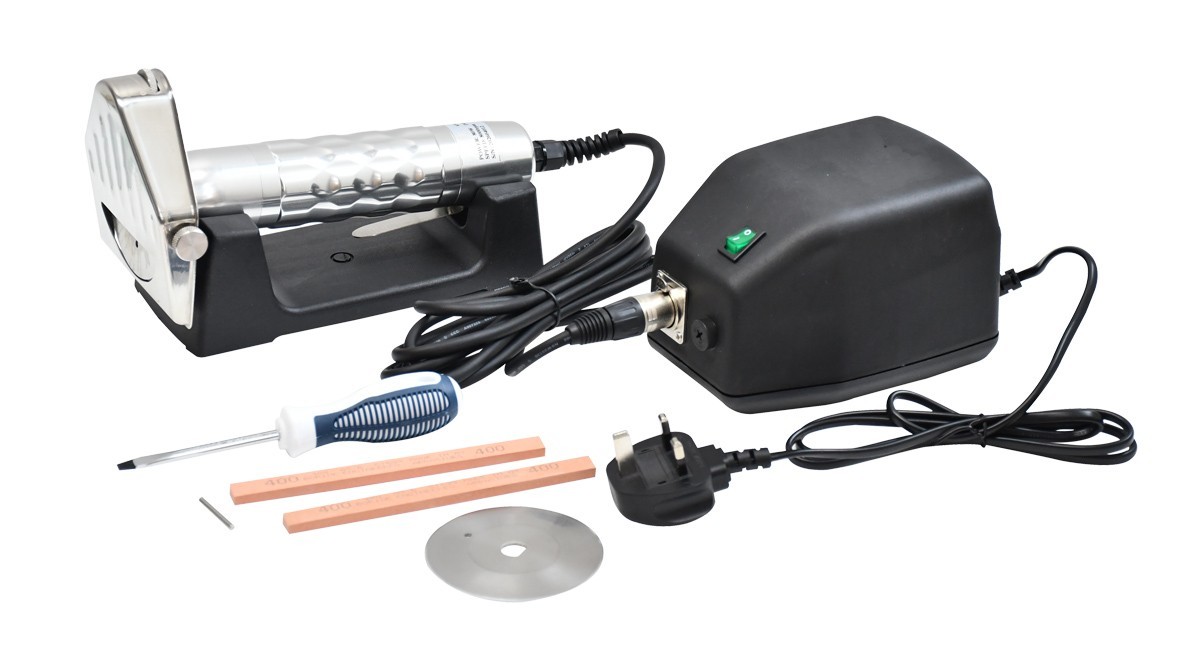
The KuKoo Kebab Carving Machine is a professional electric food slicing tool designed for efficiently carving cooked kebab, doner, shawarma and similar meat products. It is supplied with a spare circular blade, two blade sharpening stones and a screwdriver for blade replacement. The ergonomic design and integrated blade guard help improve operator safety during normal commercial food preparation.
| SKU | 218371 |
|---|---|
| Power | 80W |
| Voltage | 220-240V ~ 50/Hz |
| Weight | 4.13kg |
| Speed | 8000RPM |
KuKoo Kebab Carving Machine
EN
Safety Information
Safety Advice
• This product is intended for commercial food preparation and the slicing of cooked kebab, doner, shawarma and similar meat products only.
• Do not use this product for cutting frozen food, bones, non-food materials or any purpose other than its intended use.
• This product must only be used by trained, competent adults familiar with its operation.
• Keep children and unauthorised persons away from the work area at all times.
• Always inspect the machine, blade, power cable, plug and accessories before each use. Do not use the product if any component is damaged, loose or missing.
• Ensure the blade is securely installed in the correct orientation before switching on the machine.
• Never operate the machine if the blade is cracked, chipped, excessively worn or otherwise damaged.
• Use only replacement blades and accessories specified for this product.
• Always use the designated handle and maintain a secure grip during operation.
• Keep your hand below the red safety line on the handle at all times.
• Never place fingers or any part of the body near the rotating blade.
• Ensure the blade guard is correctly fitted before every use and never operate the machine if the guard is damaged or removed.
• Always maintain stable footing and a balanced working position while operating the machine.
• Do not overreach or use excessive force when slicing.
• Keep hair tied back and remove loose jewellery before use.
• Do not wear loose clothing, gloves with loose cuffs or anything that could become entangled in moving parts.
• Keep bystanders away from the cutting area during operation.
• Inspect the food product for foreign objects before slicing.
• Never leave the machine unattended while connected to the power supply.
• Switch the machine off immediately if excessive vibration, unusual noise, burning smell, smoke or overheating occurs.
• Disconnect the machine from the mains power immediately if a fault develops.
• Use the machine only in dry environments.
• Never immerse the machine, cable or plug in water or any other liquid.
• Do not operate the machine with wet hands or while standing on a wet surface.
• Inspect the power cable before every use and do not use the machine if the cable or plug is damaged.
• Keep the power cable away from hot surfaces, sharp edges and the rotating blade.
• Route the cable to prevent trips, snagging or accidental pulling.
• Avoid using extension leads unless they are suitable for the electrical load and environment.
• Follow the maximum continuous operating time specified for the machine to prevent overheating.
• Allow the motor and blade to cool before touching or storing the machine after prolonged use.
• Disconnect the machine from the mains supply before cleaning, sanitising, maintenance, blade replacement, sharpening or inspection.
• Never carry out maintenance while the machine is connected to the power supply.
• Wear suitable cut-resistant protective gloves when handling, removing, installing or disposing of blades.
• Ensure the blade retaining components are fully tightened before use.
• Keep the spare blade in its protective packaging when not in use.
• Store the spare blade where it cannot cause accidental injury.
• Do not use worn, cracked or damaged sharpening stones.
• Replace the blade if it cannot be safely sharpened or shows signs of damage.
• Thoroughly clean and sanitise all food-contact surfaces before first use and after every use.
• Follow local food hygiene and food safety regulations.
• Prevent cross-contamination by cleaning the machine between different food products where required.
• Do not modify the machine or fit unauthorised parts or accessories.
• Do not attempt repairs beyond the maintenance procedures described in the instruction manual.
• If the machine has been dropped or subjected to impact, inspect it carefully before further use.
• Store the machine in a clean, dry location with the blade protected from accidental contact.
• Dispose of worn blades carefully in a puncture-resistant container in accordance with local regulations.
• Dispose of electrical equipment in accordance with local Waste Electrical and Electronic Equipment (WEEE) regulations and do not dispose of it with household waste.
• Keep all packaging materials, spare blades, sharpening stones and the screwdriver out of the reach of children.
• Use only the supplied sharpening stones or manufacturer-approved equivalents to sharpen the blade.
• Follow the blade sharpening procedure described in the instruction manual.
• During blade sharpening, the sharpening stones are applied to the rotating blade. Carry out this procedure carefully, maintaining a firm grip on the machine and keeping hands clear of the blade at all times.
• Blade sharpening will produce sparks as part of the normal sharpening process. Keep the area free from flammable materials and stop immediately if excessive sparking, unusual vibration or overheating occurs.
GPSR Information
UK GPSR Information
Manufacturer
Monster Group UK Limited
Monster House 19-23 Alan Farnaby Way
Industrial Estate Sheriff Hutton
York YO60 6PG
England
+441347878880
Monster House 19-23 Alan Farnaby Way
Industrial Estate Sheriff Hutton
York YO60 6PG
England
+441347878880
Representative
Rana Harvey
Monster House 19-23 Alan Farnaby Way
Industrial Estate Sheriff Hutton
York YO60 6PG
England
+441347878880
Monster House 19-23 Alan Farnaby Way
Industrial Estate Sheriff Hutton
York YO60 6PG
England
+441347878880
EU GPSR Information
Manufacturer
Monster Group BV
Van Heemskerckweg 28A & B
-
Venlo 5928LL
Netherlands
+441347878880
Van Heemskerckweg 28A & B
-
Venlo 5928LL
Netherlands
+441347878880
Representative
Rana Harvey
Van Heemskerckweg 28A & B
-
Venlo 5928LL
Netherlands
+441347878880
Van Heemskerckweg 28A & B
-
Venlo 5928LL
Netherlands
+441347878880
Included Parts
1x
Handheld Device
1x
Power Supply Unit (PSU)
2x
Sharpening Blocks
1x
Spare Blade
1x
Stand
1x
Screwdriver
Monster Manual
Replacing the Blade
1. Removing the Blade
NOTE: Disconnect plug before replacing the blade.
WARNING: The blade is sharp and can cause deep cuts!
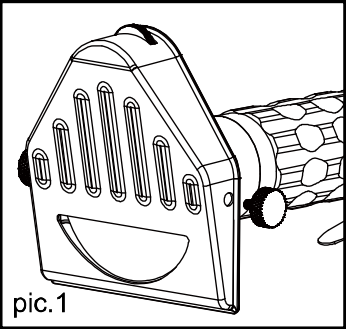
- Remove the locking screws from both sides of the blade protector (pic.1)
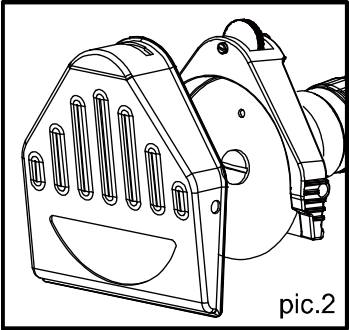
- Remove the blade protector (pic.2)
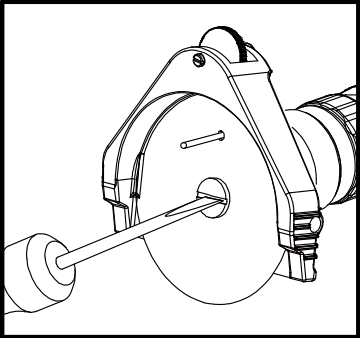
- Insert the blade-securing pin into the hole in the blade to hold it in place, then remove the screw from the centre of the blade (pic.3)
- Carefully remove the blade from the machine
2. Installing a New Blade
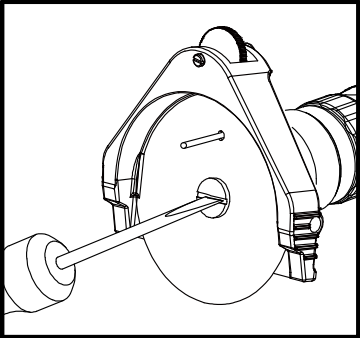
- Place the new blade into position with the bevelled side facing towards the handle, then re-insert the blade-securing pin through the hole to hold it in place
- Once the pin is inserted, reattach the screw in the centre of the blade
- Remove the blade-securing pin
- Place the blade protector back into position and reattach the locking screws at each side of the blade protector
NOTE: Incorrect installation of the blade damages the device
How to Use:
1. Before Use
- Ensure device is placed on a secure flat surface
- Allow the device to run for one minute to ensure it runs smoothly
2. Adjusting Cutting Thickness
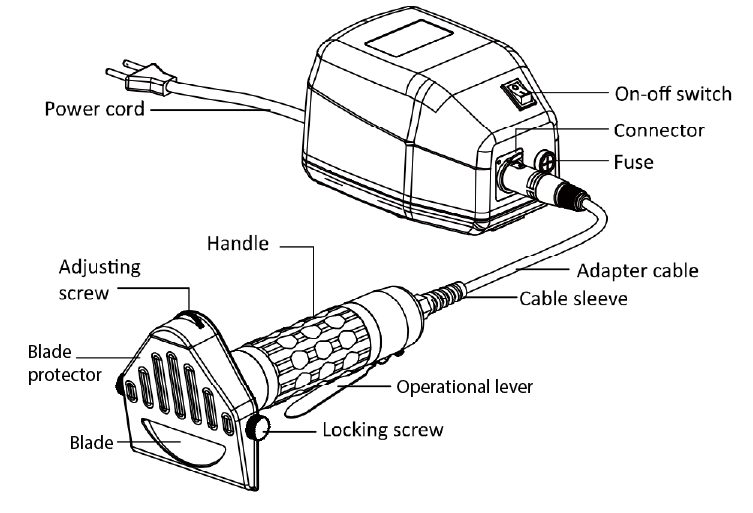
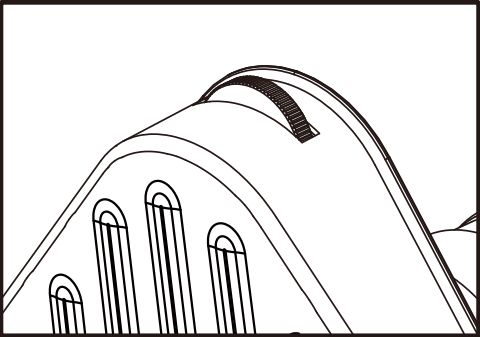
- First, loosen the locking screws at each side of the blade protector
- Turn the adjusting wheel to the right to reduce the thickness (0mm) or to the left to increase thickness (up to 6mm)
3. Using the Device
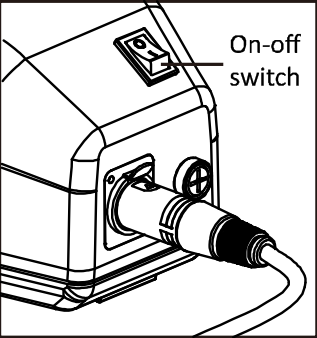
- To turn on, flip the on/off switch on the adapter
- The blade will spin when the operational lever is pressed
- When switching off, flip the on/off switch and return the adjusting wheel to the 0mm position
4. Sharpening the Blade
- While the blade is spinning, bring the sharpening block to the top edge of the blade and hold still while the blade sharpens
- Repeat with the bottom edge of the blade
WARNING: Be careful when sharpening the blade. There will be sparks.
Cleaning the Device
1. Before cleaning
- Switch the device off and unplug the device
- Return the adjusting wheel to 0mm to avoid injury
2. Cleaning the Blade and Blade Protector
NOTE: Be careful whilst handling the blade, protective gloves must be worn and avoid touching the sharpened edge
- Remove the locking screws and remove the blade protector
- Carefully remove the blade as described in the "Replacing the Blade" section
- The blade and blade protector can be washed with washing-up liquid
3. Cleaning the Device
- Use a sponge and soft brush to clean the device
- Clean all surfaces with degreaser
- Spray disinfectant on the device and leave it for at least five minutes before wiping off
- Once it has been reassembled, run the device for two minutes
NOTE: NEVER immerse the device in water
Maintenance
Disconnect the machine from the mains power before carrying out any maintenance. Inspect the blade, blade guard, cable and plug before each use and replace damaged components immediately. Clean and sanitise all food-contact surfaces after every use, sharpen the blade using the supplied sharpening stones as required, replace worn or damaged blades, and store the machine and supplied accessories in a clean, dry location.
Troubleshooting
Please read through the guide below if you have any issues or faults with your device. The information covers and resolves the majority of frequently asked questions.
Q: There are parts missing from my order.
A: If there appears to be any part missing from your package contact our Customer Support team via the details on the Contact Us page within 7 days of receipt.
Q: There is a burning smell while the blade is spinning.
A: Ensure the blade has been installed correctly with the bevelled side facing the handle. Please refer to the "Replacing the Blade" section.
For all other issues please contact our Customer Support department via the details on the Contact page.