

Flexible Lawn Edging
This durable lawn edging system is designed for neat, flexible border control around gardens, paths, and landscaped areas. Available in black, brown, green, terracotta, and grey, it includes colour-matched pegs and connectors for secure, seamless installation.
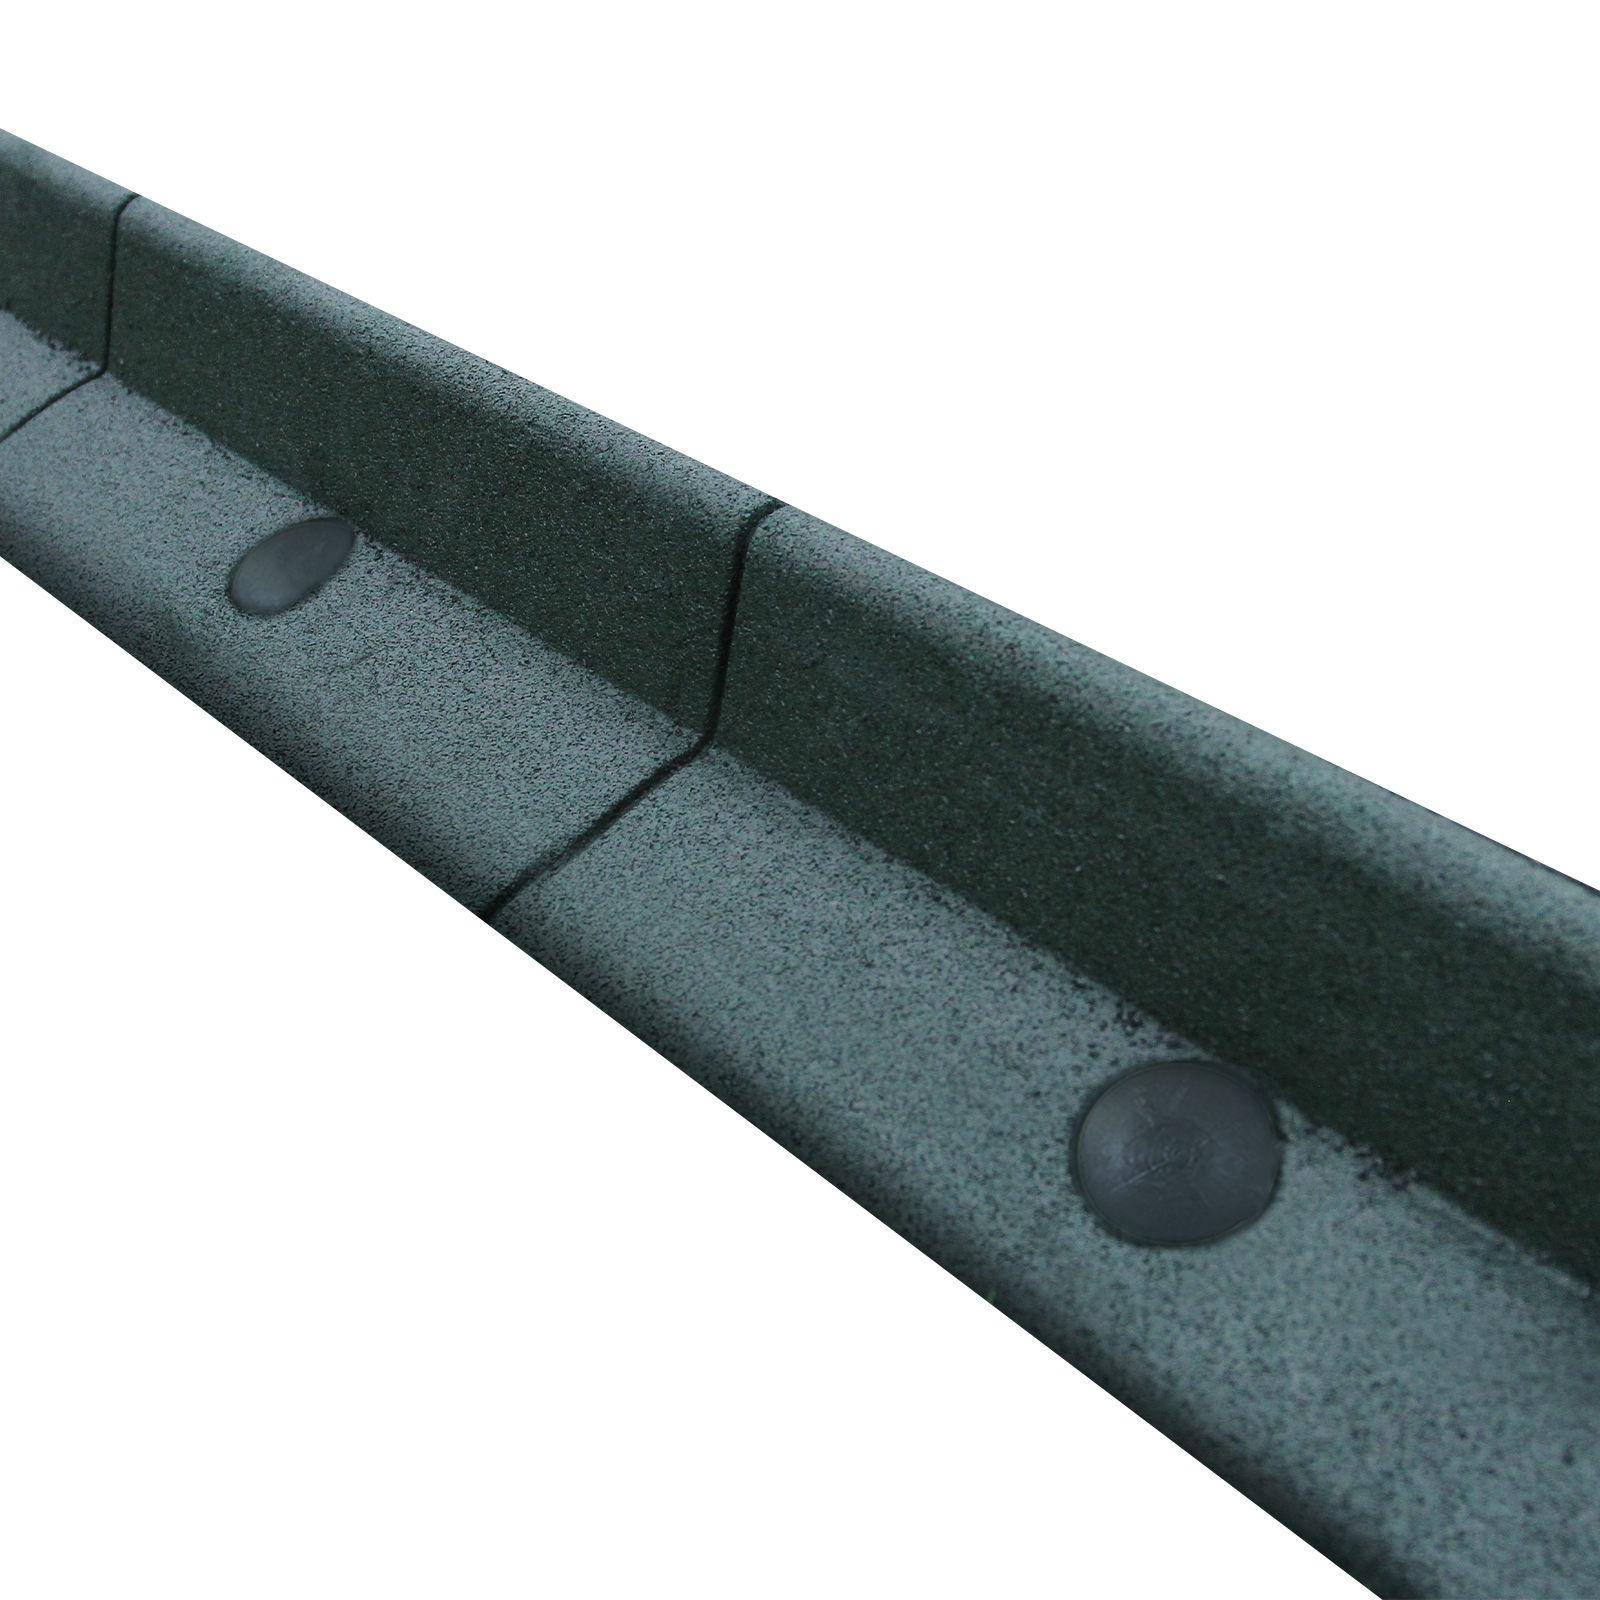
Flexible Lawn Edging
This durable lawn edging system is designed for neat, flexible border control around gardens, paths, and landscaped areas. Available in black, brown, green, terracotta, and grey, it includes colour-matched pegs and connectors for secure, seamless installation.
Product Information
This durable lawn edging system is designed for neat, flexible border control around gardens, paths, and landscaped areas. Available in black, brown, green, terracotta, and grey, it includes colour-matched pegs and connectors for secure, seamless installation. Ideal for soft ground, it creates a clean edge while blending with natural outdoor aesthetics.
| SKU | 40934,40935,40936,40937,40938,40939,40940,40941,40942,40943 |
|---|---|
| Material | Recycled Rubber |
| Product Dimensions | 85cm (H) x 81cm (D) x 1.2m (L) |
| Item Weight (Single Edge) | 3.65KG |
Safety Information
Safety Advice
- Only use this product for edging borders in gardens, flower beds, vegetable plots, and lawn perimeters; it is not designed for structural, load-bearing, or fencing applications.
- Do not install this product in high-footfall areas such as main walkways, play areas, or where individuals may step on or trip over it.
- Clearly mark newly installed edging areas during landscaping or when left unattended during installation to reduce trip risks.
- Carefully insert all supplied plastic pegs fully into soft ground; do not leave any pegs exposed above surface level as this may cause tripping or injury.
- Regularly check that all pegs and edging sections remain securely fixed in the ground, especially after rain, frost, or ground movement.
- Avoid installation on sloped or uneven ground where the edging or pins may shift over time, particularly when wet.
- Ensure you have read and fully understood the instruction manual and safety advice before using this product.
- Only use this product for edging borders in gardens, flower beds, vegetable plots, and lawn perimeters; it is not designed for structural, load-bearing, or fencing applications.
- Do not install this product in high-footfall areas such as main walkways, play areas, or where individuals may step on or trip over it.
- Clearly mark newly installed edging areas during landscaping or when left unattended during installation to reduce trip risks.
- Carefully insert all supplied plastic pegs fully into soft ground; do not leave any pegs exposed above surface level as this may cause tripping or injury.
- Regularly check that all pegs and edging sections remain securely fixed in the ground, especially after rain, frost, or ground movement.
- Avoid installation on sloped or uneven ground where the edging or pins may shift over time, particularly when wet.
- Be aware that the edging surface may become slippery when wet due to weather, watering, or dew; take care during installation and maintenance.
- Always wear sturdy gloves during handling and installation to avoid minor cuts, scratches, or contact with soil-borne hazards.
- This product is lawnmower-friendly, but caution must be taken to mow slowly and along the edge direction to avoid striking the edging or pegs.
- Keep children away from the installation area during assembly, and ensure all pegs and connectors are firmly in place to avoid removal or tampering.
- Although this product is marketed as child-safe once installed, small parts such as plastic pegs and connectors may pose a choking hazard prior to installation and should be kept out of reach of young children.
- The product is made from UV-resistant plastic, but prolonged direct sunlight may still cause gradual fading over time; this does not affect function but may impact appearance.
- Do not place the edging near open flames, fire pits, barbecues, or other heat sources, as high temperatures may deform the plastic or create a burn hazard.
- Do not cut, reshape, or attempt to heat-bend the edging beyond its designed flexibility (up to 70 degrees); doing so may weaken the material and increase the risk of breakage or injury.
- Use only the included connectors and pegs to join edging sections; substitutes may not hold securely and could result in failure or injury.
- Do not stand or step on the edging at any time; it is not designed to bear body weight and may shift or break under load.
- This product should be installed and used by competent adults only; young or vulnerable persons should not install the product without supervision.
- Dispose of all packaging materials safely and recycle where facilities exist; plastic bags and components may pose a suffocation or choking hazard.
- When the product reaches end of life, dispose of it responsibly at a local waste and recycling facility that accepts garden plastics. Do not burn the product.
- Be aware that the edging surface may become slippery when wet due to weather, watering, or dew; take care during installation and maintenance.
- Always wear sturdy gloves during handling and installation to avoid minor cuts, scratches, or contact with soil-borne hazards.
- This product is lawnmower-friendly, but caution must be taken to mow slowly and along the edge direction to avoid striking the edging or pegs.
- Keep children away from the installation area during assembly, and ensure all pegs and connectors are firmly in place to avoid removal or tampering.
- Although this product is marketed as child-safe once installed, small parts such as plastic pegs and connectors may pose a choking hazard prior to installation and should be kept out of reach of young children.
- The product is made from UV-resistant plastic, but prolonged direct sunlight may still cause gradual fading over time; this does not affect function but may impact appearance.
- Do not place the edging near open flames, fire pits, barbecues, or other heat sources, as high temperatures may deform the plastic or create a burn hazard.
- Do not cut, reshape, or attempt to heat-bend the edging beyond its designed flexibility (up to 70 degrees); doing so may weaken the material and increase the risk of breakage or injury.
- Use only the included connectors and pegs to join edging sections; substitutes may not hold securely and could result in failure or injury.
- Do not stand or step on the edging at any time; it is not designed to bear body weight and may shift or break under load.
- This product should be installed and used by competent adults only; young or vulnerable persons should not install the product without supervision.
- Dispose of all packaging materials safely and recycle where facilities exist; plastic bags and components may pose a suffocation or choking hazard.
- When the product reaches end of life, dispose of it responsibly at a local waste and recycling facility that accepts garden plastics. Do not burn the product.
GPSR Information
UK GPSR Information
Monster House 19-23 Alan Farnaby Way
Industrial Estate Sheriff Hutton
York YO60 6PG
England
+441347878880
Monster House 19-23 Alan Farnaby Way
Industrial Estate Sheriff Hutton
York YO60 6PG
England
+441347878880
EU GPSR Information
Van Heemskerckweg 28A & B
-
Venlo 5928LL
Netherlands
+441347878880
Van Heemskerckweg 28A & B
-
Venlo 5928LL
Netherlands
+441347878880
Monster Manual
Box Contents
A box of 4 lawn edgings will include 16 Pegs and 12 Connectors.
A box of 6 lawn edgings will include 24 Pegs and 12 Connectors.
Assembly
Before Installation
1. Measure the area you plan to edge to ensure you have enough sections.
2. Lay out the edging along the ground to preview the final shape.
3. Keep fixings nearby so nothing is misplaced during installation.
4. Ensure that the area is free of underground utilities before digging.
Taking time to plan the layout will help achieve a neat and consistent result.
Step2: Prepare the Border Area
Clear grass, weeds, and debris from the edging line. Dig a shallow trench along the planned route so the edging can sit securely in the soil. The trench should be deep enough to support the edging while allowing the top edge to remain visible.
Step3: Position the Edging
Place the edging sections into the trench, adjusting them to follow straight lines or curves as needed. Flexible rubber edging can be gently bent by hand to follow the natural contours of your garden.
If a section is too long, it can be trimmed to size using a suitable hand saw or cutting tool.
Step4: Secure the Edging
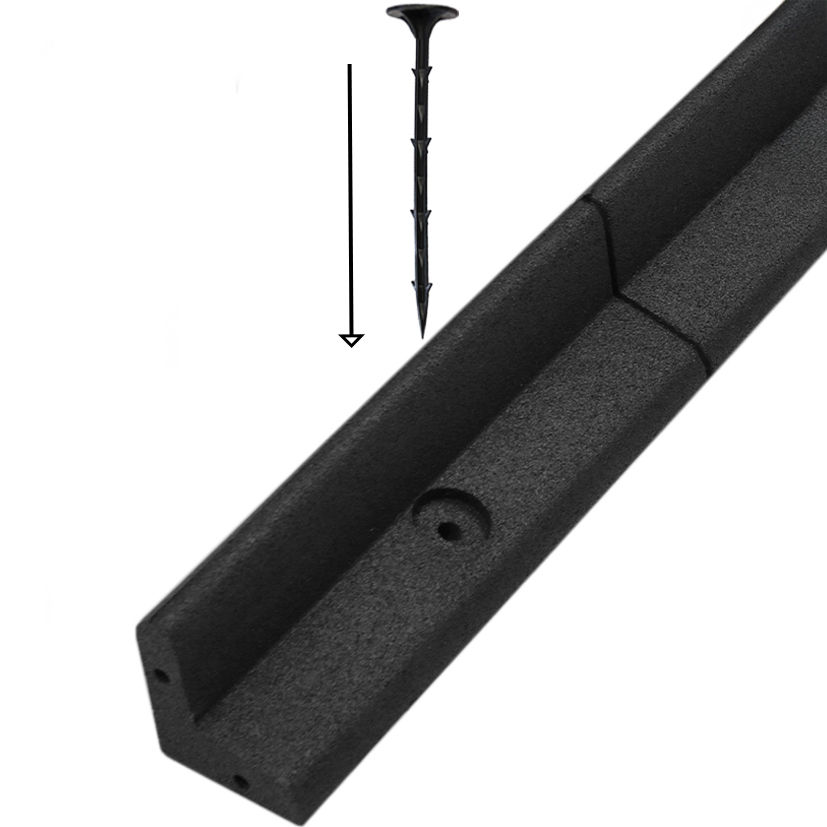
Once the edging is correctly positioned, insert a ground peg into every pre-formed hole along the edging. The holes are already spaced to ensure proper support and stability.
Drive each peg straight down using the rubber mallet provided until it sits flush with the surface of the edging. Securing all holes is essential to prevent movement and to maintain the shape of the border over time.
For curved layouts, it may be easier to fix the edging progressively as you work along the border.
Step5: Join Sections Together
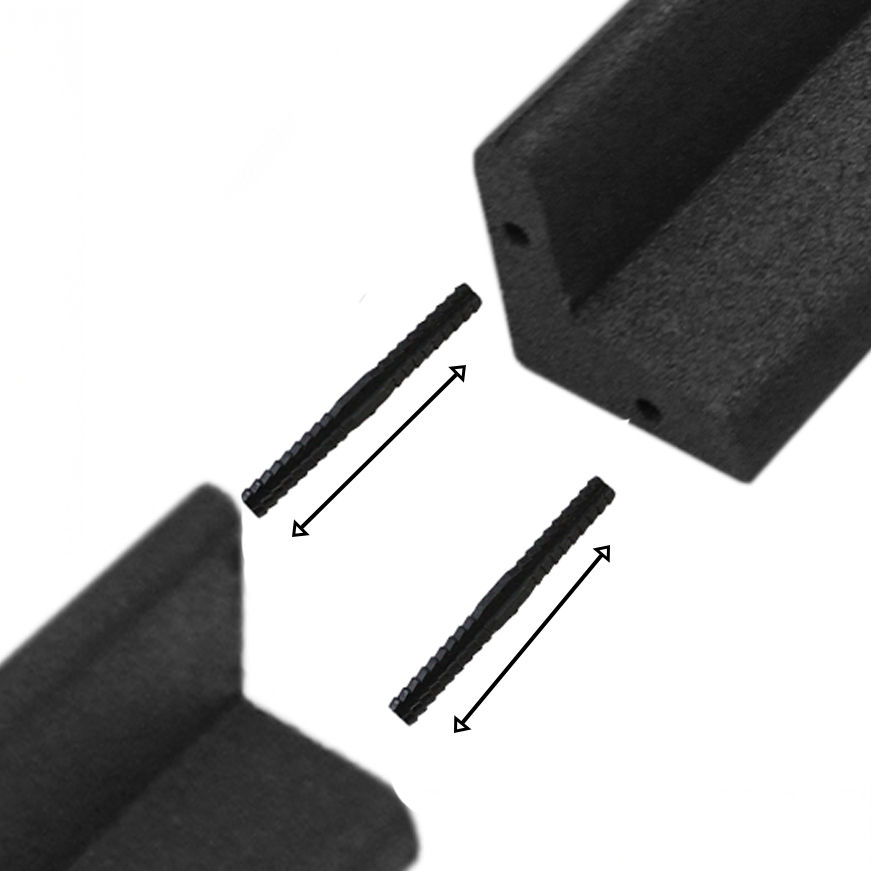
To connect multiple sections, use the supplied connector pins. These slide into the designated holes, locking adjoining pieces together and creating a smooth, continuous edge.
Maintenance
- Inspect the edging monthly, particularly after rain or frost, to ensure all pegs and sections remain securely in place and undamaged.
- Replace any cracked, warped, or loose parts immediately to prevent safety hazards or performance issues.
- Clean the edging occasionally with water and a soft brush to prevent moss or algae build-up, which may cause the surface to become slippery.
- Check the ground conditions seasonally and re-secure the edging or pegs if the soil has shifted, compacted, or become waterlogged.
- Store any unused edging, pegs, or connectors in a cool, dry area away from direct sunlight to preserve flexibility and colour.
- If a fixing stake is damaged during installation due to hard ground or stones, simply remove the obstruction and replace the stake.