

Monster Manuals|
Cover

MaxBlast 60L/100L ATV Sprayer

Detailed instructions for assembling and using the MaxBlast ATV Sprayer. It includes safety advice, a parts list and assembly instructions.
Product Information

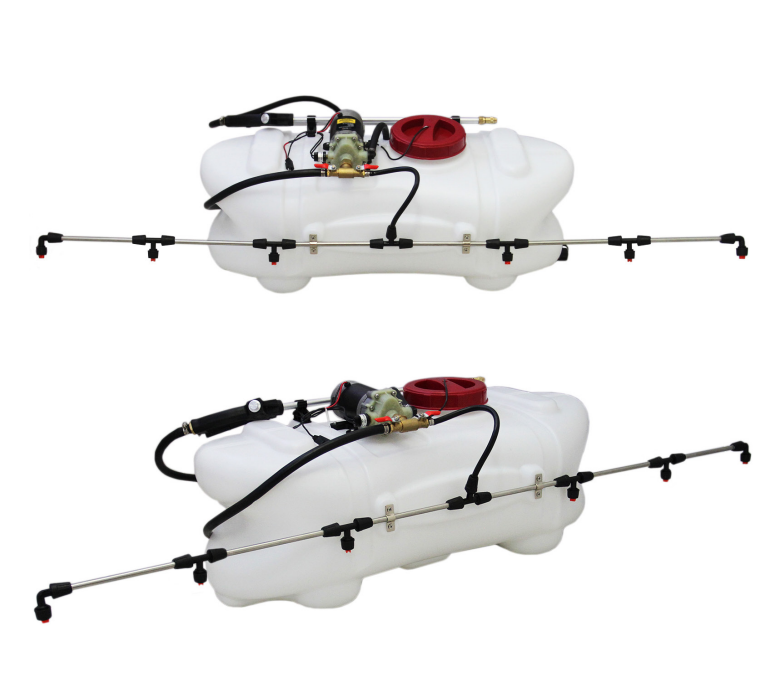
The Maxblast ATV sprayer is designed for the spraying of pesticides, herbicides, growth regulators and liquid fertilizer. Mounted on an ATV and powered by the on-vehicle 12V power supply, the sprayer is equipped with a spray gun and a spray boom. It is easy to operate and maintain. It enables the cost effective spraying of large gardens or allotments. The high-quality diaphragm pump supplies a steady flow and high pressure. The pump is fitted with a pressure limiting switch for protection. Running without water for a short time is allowed, to prime the pump and shut the pump down if the tank runs dry. The chemical tank made of high-density polyethylene plastic ensures rigidity and resistance to pesticide corrosion. Because of the design of the system the tank is not pressurised. Two-step filtration is fitted to prevent blockages of the spray gun or spray boom.

SKU 25801 - 60L 25802 - 100L
PUMP TYPE: Diaphgram Pump
MAX PUMP PRESS: 12 Bar
RATED VOLTAGE: 12VDC
MOTOR POWER: 76W
POWER CORD LENGTH: 5M
SPRAY GUN PRESS: 2-4.5 Bar
SPRAY GUN FLOW: 2.1-2.7L/min
SPRAY BOOM: 2.5 Bar
SPRAY LANCE FLOW: 2.2-2.5L/min
DIMENSIONS: 89cm x (H) x 36cm (W) x 37cm (D) 91cm x (H) x 38cm (W) x 43cm (D)

Safety Information

Safety Advice

Please read through the Safe Working Practice to ensure prevention of injury or damage to the device.
  • Do not use this sprayer for anything other than its intended purposes.
  • Ensure you have read and fully understood the instruction manual and safety advice before using this sprayer.
  • Keep this sprayer, its component parts and any contents away from children and any adult that has not read this manual.
  • Ensure this sprayer is assembled correctly.
  • Do not sit or stand on this sprayer.
  • Ensure this sprayer is fitted securely.
  • Do not use this sprayer with any product not designed to be so dispensed.
  • Ensure that any product used is handled and dispensed according to the manufacturer’s instructions.
  • Do not store any product in the sprayer tank.
  • Empty and clean the tank after use. Follow any legal requirements when disposing of unwanted product and any cleaning water.
  • In the process of level spraying with the spray boom, the sprayer should be moved at no more than 8km/h.
  • The diaphragm pump comes with a pressure protection switch and allows for short term dry running. However, this is to prime the pump only. Do not run the pump dry for extended periods.
  • Ensure this sprayer is stored in a safe place.
  • Ensure that all other materials used with this sprayer are up to standard.

GPSR Information

UK GPSR Information
Manufacturer Monster Group UK Limited
Monster House 19-23 Alan Farnaby Way
Industrial Estate Sheriff Hutton
York YO60 6PG
England
+441347878880
Representative Rana Harvey
Monster House 19-23 Alan Farnaby Way
Industrial Estate Sheriff Hutton
York YO60 6PG
England
+441347878880
EU GPSR Information
Manufacturer Monster Group BV
Van Heemskerckweg 28A & B
-
Venlo 5928LL
Netherlands
+441347878880
Representative Rana Harvey
Van Heemskerckweg 28A & B
-
Venlo 5928LL
Netherlands
+441347878880

Included Parts
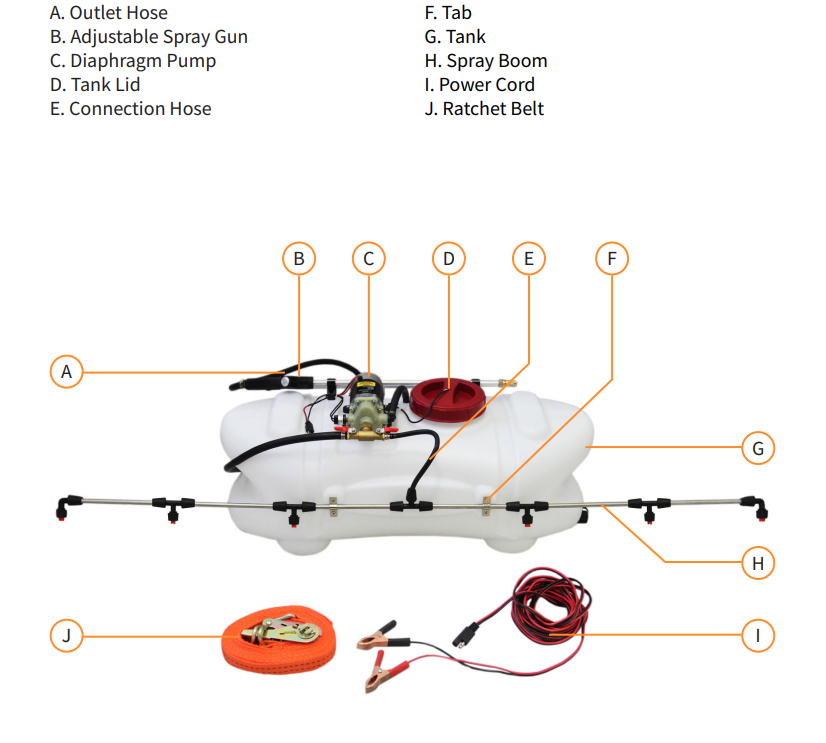
Parts Overview
1x Sprayer Body
1x Asjustable Spray Gun
1x Outlet Hose
1x Connection Hose
1x Six-Nozzle Boom
1x Tee
2x Plastic Hose Clamp
1x Stainless Steel Hose Clamp
1x Ratchet Belt
1x Ratchet Strap
4x O-ring Φ15X3
4x Fan Nozzles
1x Nozzle Gaskets
1x Plastic Hose Clamp
1x Pump Opening Gasket
2x Nozzle O-rings

Monster Manual

Assembly

1. Mounting the Sprayer
Please check that all the components on the packing list are present before beginning assembly.
1. Place the tank on the rear end of an ATV or small tractor (The side with spray boom fixing groove facing backward), and fasten it with the ratchet belts.
2. Spread the outlet hose and attach one end to the larger shut-off valve, the other end to the inlet of the adjustable spray gun, secure both ends with steel hose clamps. If not using the spray boom, the outlet hose may be wound around the tank using the depressions in the ends.
3. Press the gun body into the clamp on the tank.
4. If required, connect the spray boom components as illustrated, tightening the plastic lock nuts. Fix the assembled spray boom to the groove on the side of tank with two clips and four screws. The six nozzles should be on the same plane and facing away from the tank. The spray nozzles should be set at an angle of 10 degrees down from the horizontal.
5. The sprayer should be installed with the boom parallel to the ground and at a height of approx. 40-60cm.
6. Connect the spray boom to the smaller shut-off valve on the diaphragm pump. Secure with a steel hose clamp.
Note: If the spray boom is not required, do not carry out installation steps 4, 5 and 6.

Operation

Before first use make a trial spray with water, check the diaphragm pump works and make sure the joints are free of leakage. Empty the water from the tank.
If satisfactory proceed as follows:
1. Close the two shut-off valves. Fill the tank with a prepared chemical solution through the large strainer and then tighten the tank lid.
2. Attach the power cable to the pump stub cable. Open either the spray boom or spray gun shut-off valve as appropriate. Connect the power cable to a suitable, fused, 12v supply. The diaphragm pump will now start working. The pump note will change as it primes itself and starts to pump fluid along the pipe. At this point close the shut-off valve. The pump will stop.
3. Move the sprayer to the chosen location and open the shut-off valve. If using the spray boom the pump will now start and spraying operations may commence. If using the spray gun the trigger will need to be depressed before spraying can commence.
4. If the tank empties before spraying is complete repeat steps 1 – 3.
If using the spray gun the brass nozzle can be rotated to vary the spray pattern from coarse to fine. If a very fine spray is selected the pump motor will cycle on and off as the build up in pressure temporarily shuts the motor down. This is normal operation.

NOTE: If the pump is running from a vehicle, it is recommended to use a 10amp fuse.

After Use

To avoid unintentional spraying once the target area has been sprayed proceed as follows:
1. Turn off the shut-off valve, the pump will now stop.
2. Disconnect from the power source. If more convenient steps 1 & 2 can be reversed.
3. If using the spray gun depress the trigger to release pressure from the pipe.
4. The sprayer can now be removed from the spraying area.
5. If applicable, empty the tank of any unused product and store according to manufacturer’s instructions.
6. Clean the tank, spray boom and spray gun with clean water. Once the tank has been cleaned, flush both the spray gun and spray boom with clean water. Be careful when disposing of cleaning water as it may be contaminated with residue from the tank.

Troubleshooting

Please read through the guide below if you have any issues or faults with your device. The information covers and resolves the majority of frequently asked questions.
Q: There are parts missing from my order.
A: If there appears to be any part missing from your order, contact our friendly and helpful Customer Support Team within 7 days of receipt.
Q: I have a problem with the Sprayer.
Problems with the sprayer will fall into one of three categories: 1. Electrical problems 2. Mechanical problems 3. Blockages

The sprayer is powered by an external 12vdc supply. The power cable supplied with the sprayer is fitted with crocodile clips allowing it to be connected to battery type terminals. Use a volt meter to check the supply at this point. Ensure the correct polarity is observed. The other end (pump end) of the cable has male/female connector. Use a volt meter to check the voltage at this point, it should be 12v. If it isn’t, the cable needs repairing or replacing. If the 12v supply is good but the pump still fails to function contact customer services for
advice.

The pump is fitted with a pressure limiting switch. If power is connected with the shutoff valves closed it should shut down after a few seconds. If it doesn’t then the pressure limiting switch is faulty. Contact customer services for advice. The sprayer is mechanically very simple. The only failure point is the dual shut-off valve. The valves are operated by rotating the red handles through 90 degrees. With the handles pointing toward the pump the valve is closed. When pointing toward the output pipes the valves are open. If either of the handles will not turn the valve is seized and will need to be replaced.

With the dual filtration system blockages caused by particle ingress should not happen. However, blockages may occur if the sprayer has been stored for some time. Particularly if the spray gun and boom were not flushed with clean water after last use. If the pump functions but no spray is seen with either or both of the shut-off valves open then there is probably a blockage. Note the pump will only run for a few seconds before the pressure switch turns it off.
Q: There is a blockage.
A: To clear blockages position the sprayer in a suitable location and fill with clean water.
Proceed as follows:
1. If both the spray gun and boom seem to be blocked, disconnect the output pipes from the dual shut-off valve. Open the valves and check that there is no blockage in the valve body (you should be able to see through the valve body). If this is clear then stand in a safe place and connect the 12v supply. Water should issue from both sides of the valve body. If it doesn’t then there is probably a blockage in the pump feed pipe or filter. Disconnect the feed pipe and flush it through with water.
2. If the spray gun seems to be blocked but the boom is ok disconnect the feed pipe from the gun.
2.1. Connect the power and water should issue from the end of the pipe. If it doesn’t then disconnect the feed pipe from the shut-off valve. Turn the power on again, water should issue from the valve. If it does then the pipe is blocked. Flush it out with water and re-connect.
2.2. If water does issue from the gun end of the pipe then the gun is blocked. Undo the brass spray adjuster nozzle from the end of the gun. Turn the gun around and fit the pipe over the brass nozzle. Depress and lock the trigger then turn on the power. This will flush out any blockage in the gun.
3. If the gun is ok but the boom isn’t proceed as follows. If the whole boom seems to be blocked then it is most likely the feed pipe. Disconnect this from the boom and turn on the power. Water should issue from the pipe, if it doesn’t then the pipe is blocked. Remove it from the shut-off valve and flush through. Whilst it is off check that water does issue from the shut-off valve.
4. If some nozzles on the boom work but some don’t then it is individual spray nozzles that are blocked. These can be individually removed and cleaned. Unscrew the valve lock nut and lift the valve out. Clear it by blowing through it. They can also be replaced with the spares supplied.