Prepare your garden with ease using the T-Mech 52cc petrol tiller. With 4 steel blades, 30cm width, 20cm depth, and 9000RPM power, it’s built for tough soil. Includes safety gear, toolkit, and fuel mixing accessories—perfect for gardeners and landscapers alike.
Product Information
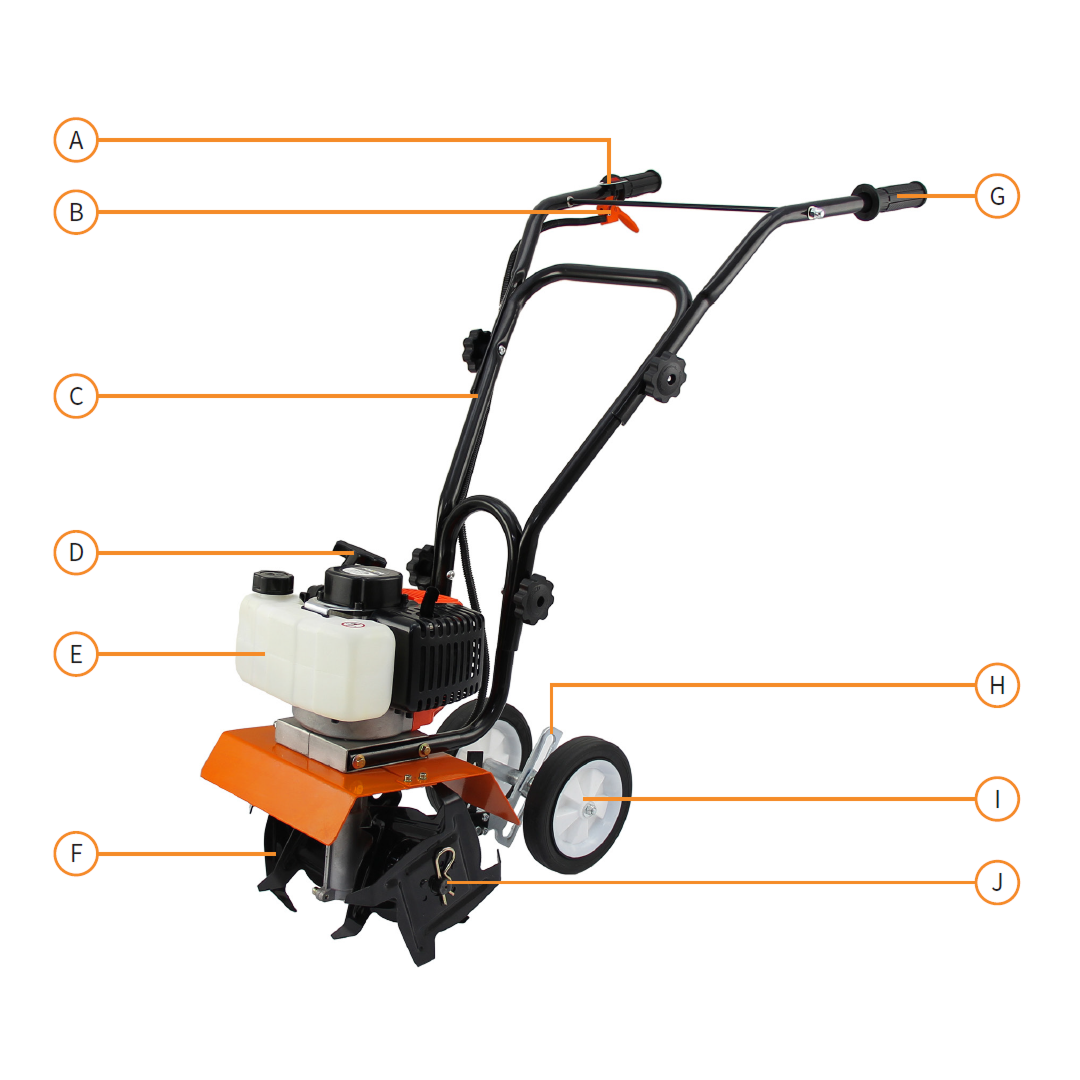
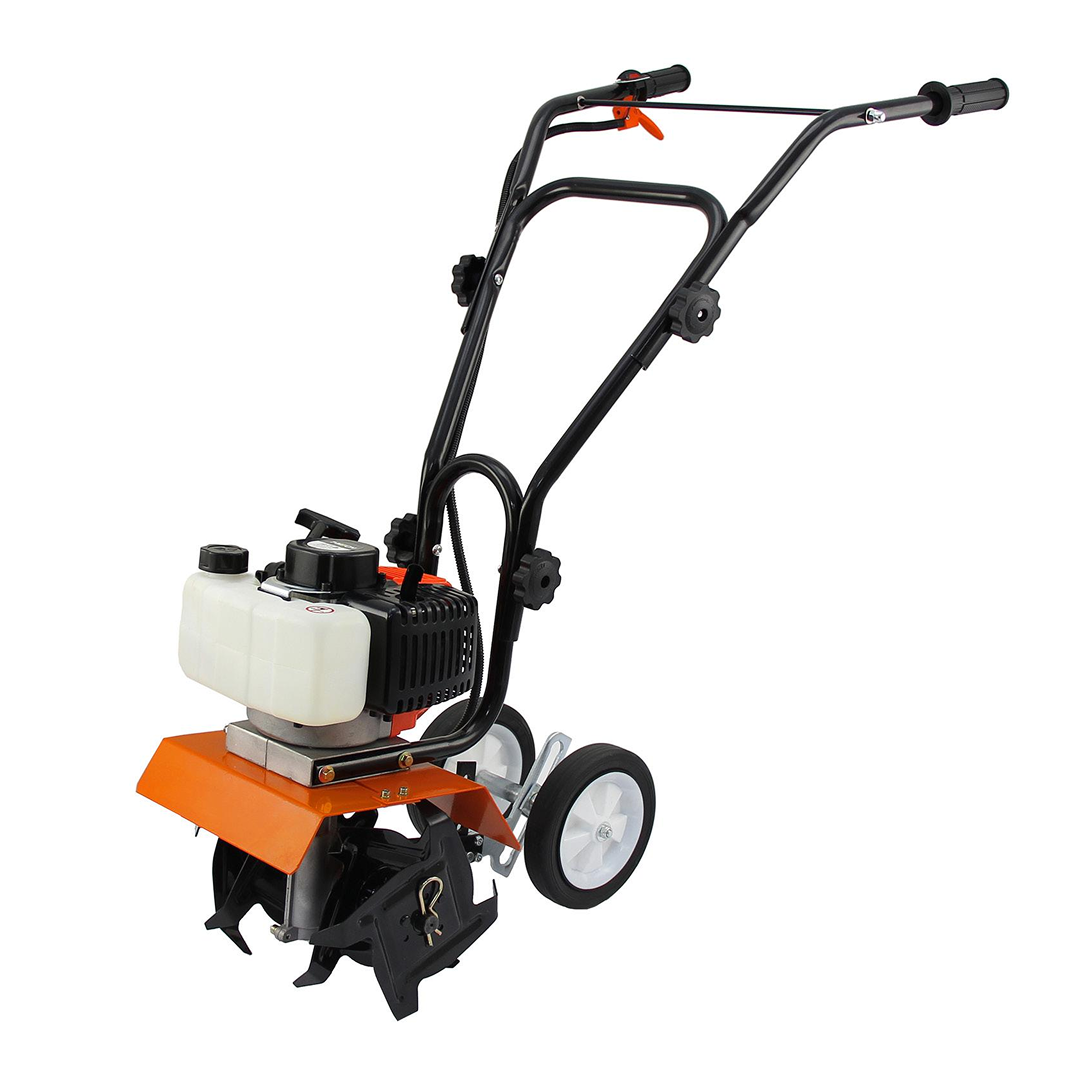
Mini Garden Tiller
Ideal for DIY enthusiasts and professional landscapers, this tiller features 4 tines each with 4 teeth, and a high powered engine. The tines can reach 15cm into the soil, ideal for maintaining lawns, borders and vegetable plots.
Equipped with a 52cc petrol engine, a 1.2L tank capacity and combined with a 2 stroke oil mix means your Mini Tiller can be easily operated. The perfect tool for cultivating small to medium sized vegetable gardens and allotment plots. You will also receive FREE safety wear including: eye and ear protection and gloves.
Please note: The Mini Tiller is designed to be used by a competent adult. The Tiller is designed to only be used on soft ground. Please keep away from any flames during the use of your Mini Tiller. Personal Protective Equipment (PPE) must be worn by the operator of this equipment.
Please refer to and read the Safe Working Practice to ensure prevention of injury or damage to the device before starting.
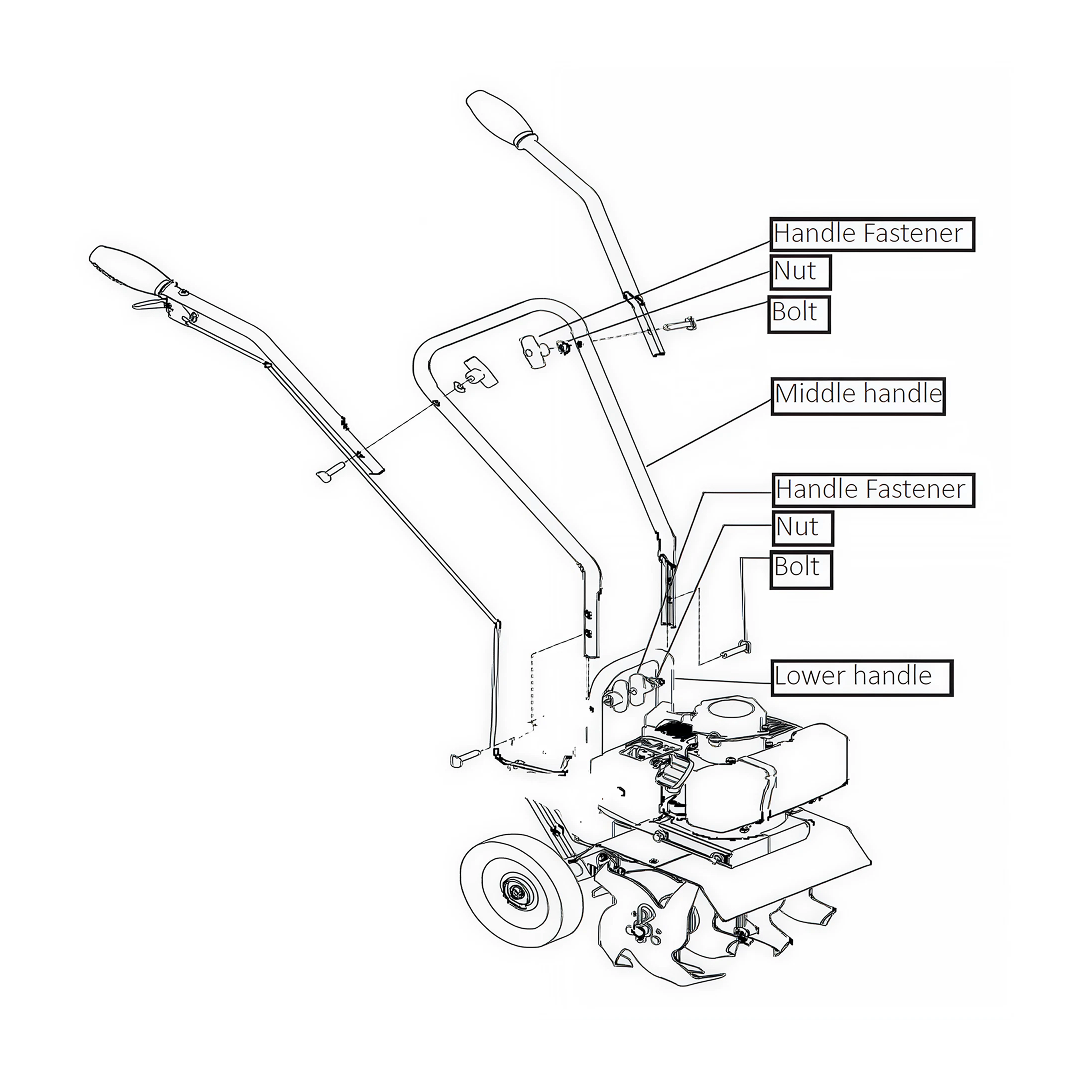
1. Secure the handles and middle handle in place before using the unit. 2. Place the middle handle onto the lower handle frame so that it bends towards the user. Align the holes in the bars of both handle frames. Use two screws, two handle fasteners, and two nuts to fix the handles together. The handle fasteners can be positioned on the inside or outside of the handles. 3. Attach the left and right handles to the middle handle frame with the remaining two nuts, two screws, and two handle fasteners. 4. Use the cable ties to fasten the cable container to the middle handle frame and the right handle. Ensure the cable container follows the curve of the handle, with no overhang and no tension on the cable.
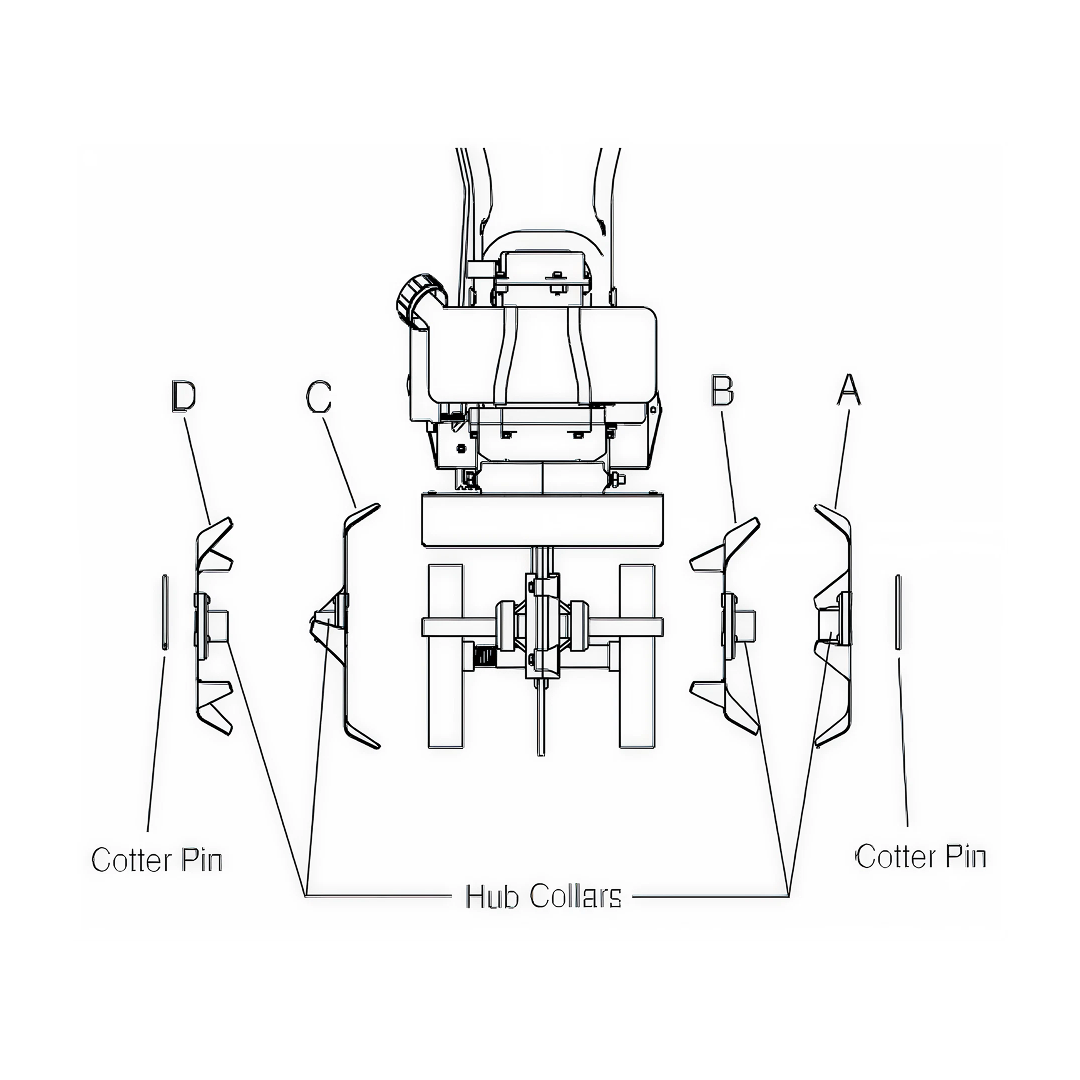
3. Tine Removal and Installation
To Remove Tines:
1. Remove the cotter pins from each end of the tine shaft. 2. Slide the four tines off the shaft.
To Install Tines:
1. Slide the inside tines onto each end of the tine shaft. One inside tine should be stamped with a 'B', and the other with a 'C'. 2. Slide the outside tines 'A' and 'D' onto each end of the shaft. Ensure the hub collars on both the left and right pairs of tines face each other, providing adequate spacing between the tine blades. 3. Insert the cotter pins into the holes at each end of the tine shaft to lock the tines into place.
4. Adjusting the Drag Stake
The drag stake is used to regulate the depth of the turning tiller tines. It also serves as a brake, slowing the tiller’s forward motion, enabling the blades to penetrate the soil.
1. Pull the pin out of the drag stake hole. 2. Position the drag stake so the pointed tip is directed downward. 3. Insert the pin into the hole that will achieve the desired depth.
5. Assembling the Wheels
The wheels on the Mini Tiller can be adjusted to one of three positions. The lowest wheel position is used to transport the Mini Tiller when the engine is not running. The two higher positions are used when cultivating the soil and help to stabilise the unit when cultivating at different depths.
1. Pull the locking metal sleeve against the spring until the wheel releases from one of the three grooves. 2. Slide the wheel set up or down to the desired position, and release the locking metal sleeve until it locks into one of the three grooves.
6. First Fuelling
The engine will need to be fuelled after assembly and before being operated.
1. Using a fuel mixing container, combine 25:1- Unleaded Petrol:2 Stroke Lubricating Oil. 2. The fuel mixing container will have level indicators for accurate mixing. Shake the container to combine. It will now be referred to as a 2 Stroke Oil Mix. Fuel must be mixed in a container in a well-ventilated area. 3. Open the fuel tank cap. Using a fuel funnel, pour the 2 Stroke Oil Mix into the fuel tank. Once filled to 80% or the indicated level, place the fuel tank cap back on and tighten.
7. Starting the Engine from Cold
1. Set the Start/Stop switch to START. 2. Set the choke lever (on the left-hand side of the engine) to the cold start position (position 1). 3. Press the primer bulb until you see the fuel flow through the transparent hose from the fuel tank to the carburettor. 4. Pull the recoil starter to start the engine. The engine should start after a few pulls. 5. Allow the engine to run for a few seconds and then move the choke lever back towards the run position (position 2). Allow the engine to run for a few seconds and then move the choke lever to the run position (position 3). 6. Squeeze the throttle lever and hold the handle grips firmly as you slowly lower the tiller and the tines make contact with the ground. 7. To stop, release the throttle and turn the start/stop switch to STOP.
8. Starting the Engine from Hot
1. Follow the exact process as from cold, except keep the choke in the run position (position 3). 2. With the engine running and the tines off the ground, pull up the throttle lever to increase the engine speed.
9. Using the Mini Garden Tiller
1. Move the Tiller to the work area before starting the engine. Transport it by pushing on the wheels and not the tines. 2. With the wheels in the correct position, the engine running and the tines off the ground, gradually increase the engine speed by pulling up the throttle lever. 3. Holding the handlebars firmly, slowly lower the tiller onto the soil. As the tines rotate, tilt the tiller forwards so that the tines can penetrate the soil. Once the ground has been broken, continue at a moderate pace. 4. You can pull the tiller backwards to improve the depth of cultivation.
By manipulating the handle bars, the operator can control the depth and speed of the tiller:
Pushing down on the handles will allow the drag bar to penetrate the soil and slow the forward motion of the tiller.
Easing up on the handles and moving the tiller gently from side to side will help to release any tines that are dug in too deeply.
When turning, push down on the handles to bring the tiller's weight to the rear; this will make turning easier.
10. Spark Plug Maintenance
Periodical maintenance is required on the Spark Plug to make sure the Mini Garden Tiller starts correctly. This should also be done before the first use after winter storage, along with a fresh fuel mix.
1. The correct air gap should be 0.5mm. 2. Stop the engine and allow it to cool. Using the multi-tool remove the spark plug. 3. Clean any dirt from around the spark plug. Do not let any dirt enter the cylinder. Re-gap the spark plug using a Feeler Gauge, replace and tighten.
11. Air Filter Maintenance
1. Remove the air filter cover by loosening the socket head cap screws. 2. Remove the sponge air filter from inside and wash it in detergent and water. Rinse thoroughly and make sure it is completely dry. 3. Apply oil to the filter and replace it and the air filter cover. Remember to secure the socket head cap screws.
12. Body Maintenance
After the first use, check that no screws are loose.
13. Resolution Guide
WHAT DO I DO IF THERE ARE MISSING PARTS FROM MY ORDER?
If there appears to be any part missing from your order, contact our friendly and helpful Customer Support Team within 7 days of receipt.
MY MINI GARDEN TILLER WILL NOT START.
Check that the fuel tank has the correct type and amount of fuel in it. Then carry out the Spark Plug maintenance listed under Maintenance Instructions to see if this solves the problem. If the issue continues, call or email our Support Team.
I DO NOT THINK MY MINI GARDEN TILLER IS RUNNING CORRECTLY.
Call or email our Support Team, details on the Contact Us page and our friendly and helpful team will listen to any problem and find a resolution.
THE TINES ARE STILL SLOWLY OPERATING AFTER THE THROTTLE HAS BEEN RELEASED.
There may be tension on the throttle cable, move the throttle cable down the handle towards the engine to release tension. However, the engine might be overfilled. This can simply be fixed by turning the carburettor screw anti-clockwise until the engine revs drop and the tines stop.
FOR ALL OTHER ISSUES, PLEASE CONTACT OUR CUSTOMER SUPPORT TEAM.