Instructions for assembling, installing, and using the Monster Portable Horse Shower 18L Deluxe, ensuring a comfortable and efficient bathing experience for horses. It includes safety advice, operational guidelines, and maintenance tips.
Product Information
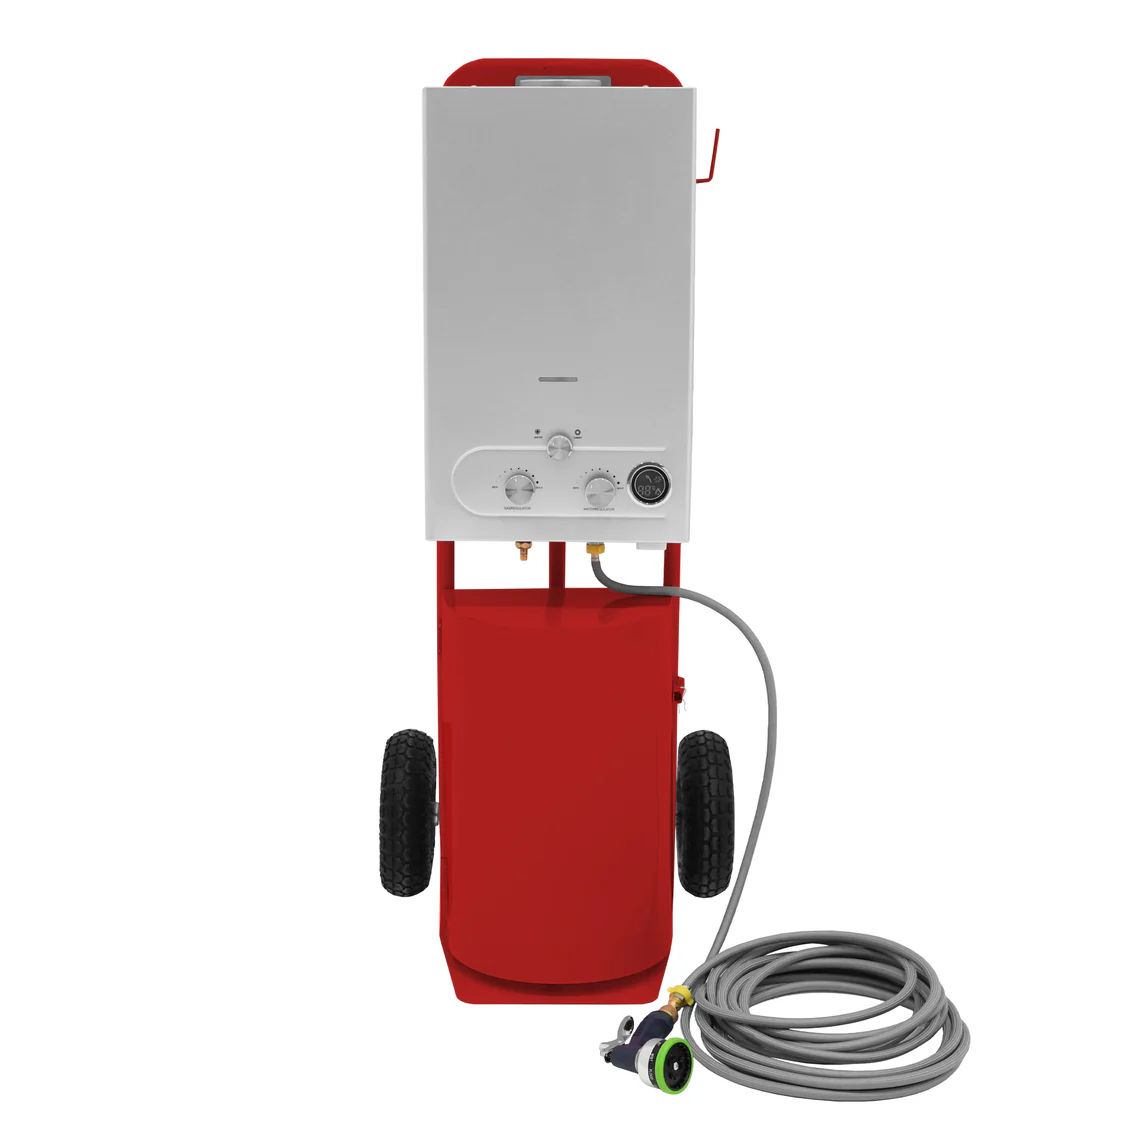
Portable Horse Shower 18L Deluxe
The Monster Portable Horse Shower 18L is an indispensable tool expertly tailored for horse owners! It ensures a comfortable bathing experience, accommodating various sizes. Whether for routine cleaning, post-exercise, or grooming, enjoy consistent water flow and temperature control. Its portability adds convenience, and the 200kg trolley capacity enhances adaptability.
Water pressure: 0.025 – 0.8 mpa (recommended range)
Temperature: 0°C to 75°C
Battery: 2 pcs D 1.5V batteries (not included)
Safety certification: CE certification
Trolley
Dimensions: 126 cm (H) x 53.5 cm (W) x 54 cm (D)
Trolley tube thickness: 1.1 mm
Wheels: 10” pneumatic tires
Toe plate dimensions: 35 cm (L) x 27.5 cm (W) x 28 cm (D)
Trolley capacity: Max 200 kg
Water pressure: Min. 0.015 mpa / Max. 0.5 mpa
Gas pressure: LPG – 28 mbar
Water connection: G1/2" pipe
Gas connection: 9.5 mm (0.37 in) gas hose
Tools
Water Heater
10m Outlet Pipe
Sprayer
Gas Tube
Screws
Trolley
Curry Comb
Plastic Sweat Scraper
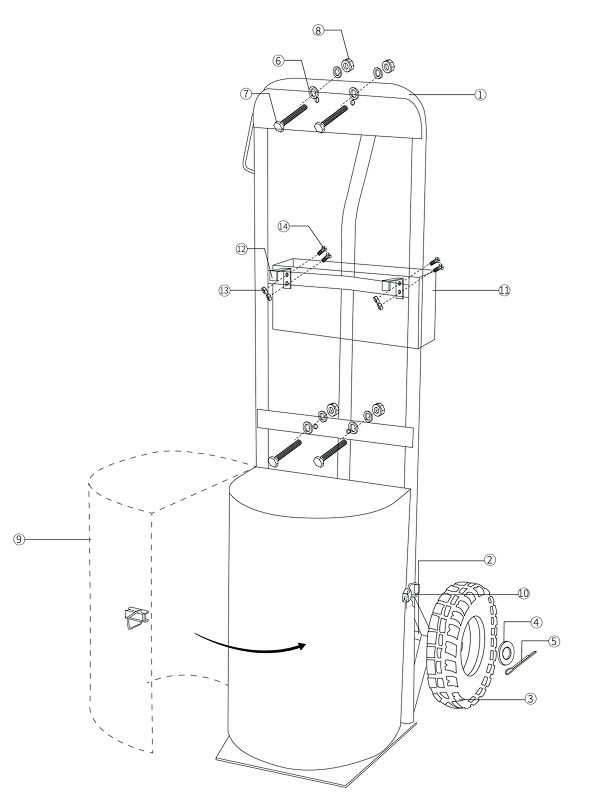
Parts
1Handle
2Wheel
3Axle
4Washer
5Wheel tension pin
6Flat washer
7Bolt
8Nut
9Gas cylinder cover
10Gas cylinder cover pin
11Storage Tray
12Storage Tray Hook
13Storage Tray Nut
14Storage Tray Bolt
1. Attach the wheels
Fix the wheels on the trolley as shown in the diagram under “Parts”.
2. Mount the water heater
Add the gas water heater box on top of the trolley, and keep it in place near the handles of the trolley. Use the provided screws to mount the water heater onto the trolley handles.
3. Check pipe cleanliness
Ensure the gas and water connection pipes are clean and free of any debris.
4. Connect pipes
Connect the gas pipe and the inlet/outlet water pipes as shown in the diagram under “Parts”.
5. Insert the batteries
Insert two D 1.5V in the battery box. Ensure these are thoroughly dry prior to insertion and that they are placed in their corresponding polarities.
6. Check for gas leaks
Before turning the water heater on, always ensure there is no gas leakage from the gas connection.
7. Start water flow
Open the water tap. Once water starts flowing, multiple sparks will ignite the main burner.
8. Retry ignition if needed
If the burner does not ignite, close the water tap and repeat the process. This can happen due to some air in the gas pipe.
9. Shut off water
To turn it off, close the water tap.
10. Gas regulator control button knob
Turn the gas button knob clockwise to increase the gas supply and anti-clockwise to decrease the gas supply to the main burner.
11. Water regulator control button knob
To get hotter water, reduce the flow rate by turning the button knob clockwise.
To get colder water, increase the flow rate by turning the button knob anti-clockwise.
The temperature of the water can be controlled by turning the gas control button knob and/or water control button knob accordingly.
12. Summer and winter button knob
Regulate the quantity of fire rows by the use of winter-summer switch. In summer, shut off 1/4 fire rows to save 40% energy.
13. Authorized Personnel Only
The heater must be maintained and checked only by qualified and authorized technicians.
14. Annual Safety Check
The heater must be checked for safe operation annually, regardless of the frequency of use. This is principally to ensure the correct combustion for the main burner.
15. Hard Water Effects
If the heater is used in an environment with prevalent hard water, over time a reduction in the hot water temperature or hot water flow may occur. This is due to scale formation.
16. Preventing Scale FormationTo reduce scaling, it is recommended to use the water and gas control knob to obtain the desired water temperature, instead of mixing cold and hot water together.
To reduce scaling, it is recommended to use the water and gas control knob to obtain the desired water temperature, instead of mixing cold and hot water together.
17. Scale Removal
Scaling can only be removed by authorized technicians.
18. Identify and Resolve Issues
| Trouble | Possible Cause | Remedies | | :----------------------------- | :------------------------------------------------ | :---------------------------------------------------- | | Unsuccessful ignition | Main gas cock and/or cold water tap is not opened | Open the main gas cock and/or cold water tap | | | Batteries (dry cell) depleted | Replace batteries | | | Gas pipe contains air | Repeat ignition process | | | No gas supply available | Replace LPG bottle or contact gas supplier | | | Low water pressure (below 0.3 bar) | Ask gas supplier to check and increase water pressure | | Heater does not start | Water inlet filter is clogged | Clean the filter | | Fire goes off during operation | Gas cock is half open | Call a technician | | | Gas pressure is too low | Call a technician | | Abnormal flame and smell | Blocked burners | Take to the nearest service center | | Flame turns yellow with smoke | Blocked burners | Take to the nearest service center | | Abnormal ignition noise | Gas cock is half open / Gas pressure too low | Call a technician |
19. Resolution Guide
What do I do if there are missing parts from my order?
If there appears to be any part missing from your order, contact our friendly and helpful Customer Support Team within 7 days of receipt.
For all other issues, please contact our Customer Support Team.