monstershopmonstershop.co.uk
Instructions by monstershopPremium Cocktail Bar Station
monstershop

Premium Cocktail Bar Station

Premium Cocktail Bar Station
Before you start
Safety Advice Parts
Steps
1. Installing the Tap 2. Assembling the Drainage Pipes 3. Install the Water Inlet 4. Maintenance 5. Troubleshooting

No results

monstershop
monstershop / Premium Cocktail Bar Station
Premium Cocktail Bar Station
monstershop

Instructions by

monstershop

Premium Cocktail Bar Station

Streamline your drink service with the Premium Cocktail Bar Station — a durable, stainless-steel unit built for high-performance bar environments.

Product Information

Premium Cocktail Bar Station

Expand your workspace and streamline your drink service with the Premium Cocktail Bar Station — a durable, stainless-steel unit built for high-performance bar environments. Featuring an integrated sink with mixer tap, glass refresher, chopping board, cocktail shaker and strainer, knife holder, and multiple stainless steel gastro pots for organised garnish storage, it provides a hygienic and efficient setup for professional bartenders.
SKU
216974
Specifications:Attribute:
Dimensions:1450 x 550 x 850 cm
Net Weight:51 KGs
Main Body Material:Stainless Steel
Gastro Pots Material:Stainless Steel
Drainer Material:Stainless Steel
Drain Kit and Pipe Material:Polypropylene and PVC
Drain Kit Material:PVC
Tap Material:Stainless Steel and Copper
Feet Material:Stainless Steel and Zinc Alloy
Knife Holder Material:Stainless Steel and PVC

GPSR Information

UK

  • Manufacturer:

Monster Group UK Limited, Monster House

19-23 Alan Farnaby Way,

Industrial Estate Sheriff Hutton,

York

YO60 6PG

  • Person Responsible:

Rana Harvey, Monster Group UK Limited,

Monster House

19-23 Alan Farnaby Way,

Industrial Estate Sheriff Hutton,

York

YO60 6PG,

England,

+441347878880

EU

  • Manufacturer:

Monster Group BV,

Van Heemskerckweg 28A & B,

Venlo 5928LL

Netherlands

+441347878880

  • Person Responsible:

Rana Harvey,

Monster Group BV,

Van Heemskerckweg 28A & B,

Venlo 5928LL,

Netherlands,

+441347878880

Safety Advice

  • Only trained staff familiar with safe bar operation should assemble or use this product.
  • Always insert knives blade-down into the holder to minimise the risk of accidental cuts.
  • Keep the knife holder dry and clean to prevent bacterial build-up.
  • Use the chopping board only for its intended purpose; avoid cutting directly on stainless steel surfaces.
  • Do not attempt to sharpen knives against any part of the station; always use proper tools away from the unit.
  • Use caution when operating the integrated mixer tap; always test water temperature before use to prevent burns.
  • Do not use the sink for food or ingredient preparation unless properly cleaned between uses.
  • Keep hands and face clear of the rinser nozzle during activation to prevent spray injuries.
  • Check the glass rinser daily for clogging or irregular spray; do not use if malfunctioning.
  • Clean up any spilled liquids immediately using appropriate mops or cloths to prevent slipping.
  • Install anti-slip mats beneath and around the station to provide stable footing for users.
  • Ensure drainage hoses are connected correctly and unobstructed before use; check for leaks or signs of wear.
  • Do not pour fats, oils, or solids into the sink to prevent drainage blockages.
  • Route all drainage hoses along fixed paths to avoid trip hazards or accidental disconnection.
  • Never step over exposed hoses; always maintain clear walkways around the station.
  • Ensure the station is installed on a level, solid surface to maintain stability during use.
  • Do not overload the station with equipment or supplies beyond its designed bar preparation purpose.
  • This product is intended for indoor use only; do not install or operate outdoors or in mobile units.
  • Do not modify or attach any non-approved components to the station.
  • Keep children and unauthorised personnel away from the station at all times.
  • Sanitise the chopping board between shifts and after contact with different ingredients.
  • Dispose of this product in accordance with local commercial waste and metal recycling regulations.
  • Small detachable parts (e.g. drain filters or hose fittings) may pose a choking hazard and must be kept away from children.

Parts

Waste Pipe
Large Gasket
Small Gasket
Tap
Plastic Mounting Nuts

1. Installing the Tap

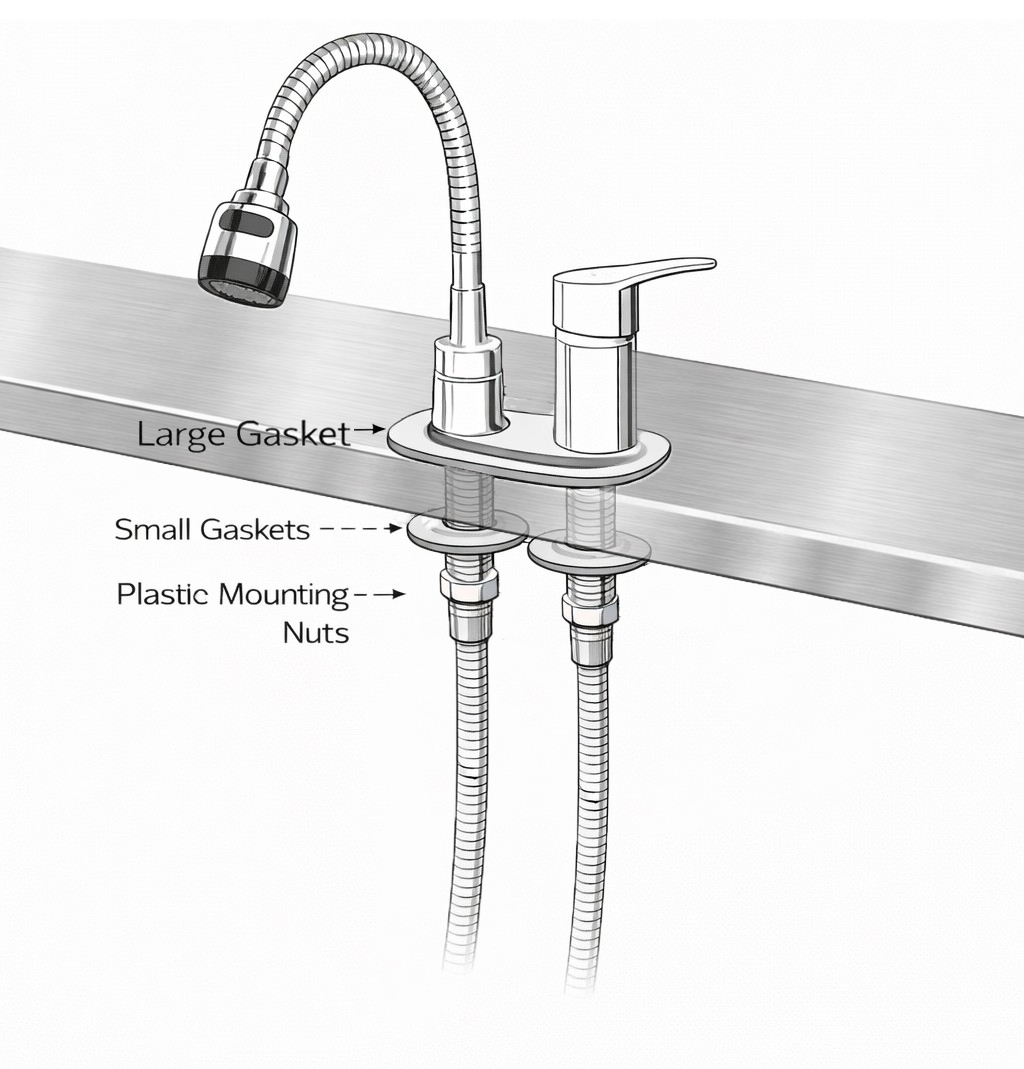
  • Position the large gasket between the base of the tap and the countertop on the top side of the sink.
  • From underneath, slide the two small gaskets onto the threaded bolts of the tap.
  • Secure the tap by tightening the plastic mounting nuts onto the threaded bolts from underneath the sink.

2. Assembling the Drainage Pipes

  • Connect waste pipe (1) from the knife holder drain to the waste connector.
  • Connect waste pipe (2) from the sink overflow to the waste connector.
  • Connect waste pipe (3) from the outlet beneath the sink (for the glass refresher) to the waste connector.
  • Connect waste pipe (4) from the ice well drain to the waste connector.
  • Finally, connect waste pipe (5) to the waste connector and route the end of this pipe to an appropriate waste outlet.

3. Install the Water Inlet

  • The tap and glass refresher both need to be connected to the water supply.
  • The tap requires both cold and hot water inlets.
  • The glass refresher can be connected to either cold or hot water according to the customer's needs.

4. Maintenance

  • Clean all stainless-steel surfaces daily using non-abrasive, food-safe cleaners to prevent corrosion and maintain hygiene.
  • Sanitise the chopping board after every shift or between raw ingredient use.
  • Rinse and dry the knife holder daily to prevent moisture accumulation and bacterial growth.
  • Flush the glass rinser each day to prevent build-up and ensure consistent water spray.
  • Clean the sink and check the drainage hose for obstructions or leaks at least once per week.
  • If connected to hot water, test the mixer tap for leaks or dripping and repair as needed.
  • Avoid using abrasive pads or wire brushes that could damage the surface finish.
  • Tighten any loose fixings or brackets during regular inspection to ensure the unit remains structurally stable.

5. Troubleshooting

Please read through the guide below if you have any issues or faults with your device. The information covers and resolves the majority of frequently asked questions.

Q: There are parts missing from my order. A: If there appears to be any part missing from your package contact our Customer Support team via the details on the Contact Us page within 7 days of receipt.

For all other issues please contact our Customer Support department via the details on the Contact page.

monstershop
monstershop (opens in new tab)Terms (opens in new tab)Privacy (opens in new tab)