monstershopmonstershop.co.uk
Instructions by monstershopT-MECH 12v Mounted Spreader
monstershop

T-MECH 12v Mounted Spreader

T-MECH 12v Mounted Spreader
Before you start
Safety Advice GPSR Information Parts
Steps
1. When unpacking the tools2. Assembly 3. How to attach to your ATV4. Operation5. Maintenance6. Troubleshooting

No results

monstershop
monstershop / T-MECH 12v Mounted Spreader
T-MECH 12v Mounted Spreader
monstershop

Instructions by

monstershop

T-MECH 12v Mounted Spreader

Take the effort out of large-scale spreading with this powerful and versatile ATV mounted spreader.

Product Information

T-MECH 12v Mounted Spreader

T-MECH 12v Mounted Spreader

The T-Mech 12v Mounted Spreader is a reliable and efficient tool designed for spreading seeds, fertiliser, salt, or other materials with ease. Powered by a 12v system, this mounted spreader ensures consistent application, making it ideal for agricultural, landscaping, and winter maintenance tasks. Its robust design, easy mounting system, and adjustable spread settings deliver both precision and convenience, helping you save time and effort on large-scale spreading jobs.
SKU
212274
Hopper CapacityHopper Dimensions
43.5L/80lbs/38kg59 x 42 x 37 cm

GPSR Information

UK

  • Manufacturer: Monster Group UK Limited, Monster House 19-23 Alan Farnaby Way, Industrial Estate Sheriff Hutton, York YO60 6PG

  • Person Responsible: Rana Harvey, Monster Group UK Limited, Monster House 19-23 Alan Farnaby Way, Industrial Estate Sheriff Hutton, York YO60 6PG, England, +441347878880

EU

  • Manufacturer: Monster Group BV, Van Heemskerckweg 28A & B, Venlo 5928LL Netherlands +441347878880

  • Person Responsible: Rana Harvey, Monster Group BV, Van Heemskerckweg 28A & B, Venlo 5928LL, Netherlands, +44134787888

Safety Advice

Ensure you have read and fully understood the instruction manual and safety advice before using this product.

  • Inspect all wiring, connectors, and electrical components for wear or damage before each use. Do not operate the spreader if any damage is found.
  • Only use the spreader with compatible 12V power sources, as specified in the instruction manual.
  • Follow all manufacturer’s instructions when connecting or disconnecting the power source.
  • Turn off and disconnect the spreader from the power source before performing maintenance, refilling, or cleaning.
  • Keep hands, tools, and any other objects clear of moving parts, including the rotating spreader, while in operation.
  • Do not exceed the maximum load capacity specified in the instruction manual to avoid tipping or mechanical failure.
  • Distribute the material evenly in the hopper to prevent imbalance and ensure stable operation.
  • Avoid operating the spreader on busy walkways or in environments where the spread material may cause slips or falls.
  • Ensure that nearby individuals are warned of the spreader’s operation to prevent accidental injuries.
  • Wear appropriate personal protective equipment (PPE) if handling or spreading potentially hazardous materials.
  • Do not use the spreader to dispense substances that are flammable, corrosive, or otherwise dangerous unless explicitly approved in the manual.
  • Clean any spills of spread materials promptly to prevent contamination or accidents.
  • Perform regular maintenance as outlined in the instruction manual, including lubricating moving parts and tightening loose components.
  • Ensure the spreader is securely mounted to the vehicle or designated platform before operation.
  • Check the spreader’s fastenings and connections periodically during use to confirm they remain secure.
  • Operate the spreader at a safe speed and in appropriate environmental conditions to avoid damage or reduced performance.
  • Store the spreader in a dry, secure location when not in use to prevent electrical or mechanical damage.
  • Do not operate the spreader under the influence of alcohol, drugs, or medications that may impair your ability to use it safely.
  • Ensure proper disposal of any leftover material in accordance with local regulations to prevent environmental harm.

GPSR Information

UK

  • Manufacturer: Monster Group UK Limited, Monster House 19-23 Alan Farnaby Way, Industrial Estate Sheriff Hutton, York YO60 6PG, England.
  • Person Responsible: Rana Harvey, Monster Group UK Limited, Monster House 19-23 Alan Farnaby Way, Industrial Estate Sheriff Hutton, York YO60 6PG, England. +441347878880

EU

  • Manufacturer: Monster Group BV, Van Heemskerckweg 28A & B, Venlo 5928LL Netherlands.
  • Person Responsible: Rana Harvey, Monster Group BV, Van Heemskerckweg 28A & B, Venlo 5928LL, Netherlands. +441347878880

Parts

Hopper Assembly
Hopper Assembly
Frame
Frame
Rain Cover
Rain Cover
J-Bolt
J-Bolt
Press Plate
Press Plate
Nut M6
Nut M6
Screw M5x35
Screw M5x35
Deflector
Deflector
Hex Head Bolt M6x30
Hex Head Bolt M6x30
Nylon Lock Nuts M6
Nylon Lock Nuts M6

1. When unpacking the tools

1. Carefully remove the tool and accessories from the box. 
2. Make sure that all items listed in the packing list are included. 
3. Inspect the tool carefully to make sure no breakage or damage occurred during shipping. 
4. Do not discard the packing material until you have carefully inspected and satisfactorily operated the tool.

WARNING: If any parts are missing, do not operate the tool until the missing parts are replaced. Failure to do so could result in possible serious personal injury

2. Assembly

  • Attach frames to hopper as shown using M5x35 Wood Screws. 
  • Position the rate control assembly to either frame rail based on if the spreader is mounted to the front or the rear rack. If mounted on front rack the control should be positioned to the left rail, if mounted on the rear rack the control should be positioned on the right rail.
  • To attach the deflector, use 2 sets of hex head bolts M6x30 and nylon lock nuts M6 to install the deflector assembly under the frame.

3. How to attach to your ATV

  • Position the assembled spreader centered on either the front or rear luggage rack on your ATV. Next using the included “J-Bolts”, connect the rear cross bars to the luggage rack cross bar closet to the seat or handlebars. Using the 2 included “Double J-Bolts”, attach the spreader to the luggage rack securing it to the outer most rail on the luggage rack. Tighten all fasteners and cut any excessive bolt lengths that extend beyond the nuts on the “U & J-Bolts” and smooth if necessary.

WARNING: Prior to each use, inspect the mounting hardware and the spreader to ensure the rigidity of the mount by tightening any loose hardware either on the Spreader or Luggage Rack mounts.

4. Operation

  • Determine how much material is to be applied per 1,000 sq/ft. 
  • Measure off a distance of 50 feet, preferably on a paved surface such as a parking lot. 
  • Weight out enough of the material to be applied to fill the hopper at least half full. Record the weight for future use. 
  • With the unit mounted on the vehicle and the hopper at least half full of the material to be spread, position the vehicle far enough before the beginning of the 50 foot test area so that the vehicle will achieve the desired speed before you reach the starting line. 
  • Set the rate setting stop at a position that you feel would be an appropriate setting. 
  • Start the vehicle in motion and as you cross the starting line (of the 50 feet) move the rate lever to the open position against the stop. Take care to be aware of what is going on around you when maintaining control of the vehicle. 
  • Continue from the starting line with the unit spreading the material. As you cross the finish line, move the rate lever to the closed position. 
  • Stop the vehicle and note the width of the spread path that as just completed. 
  • Return to the start point and empty the remaining material from the hopper into your weighing container and re-weight.

5. Maintenance

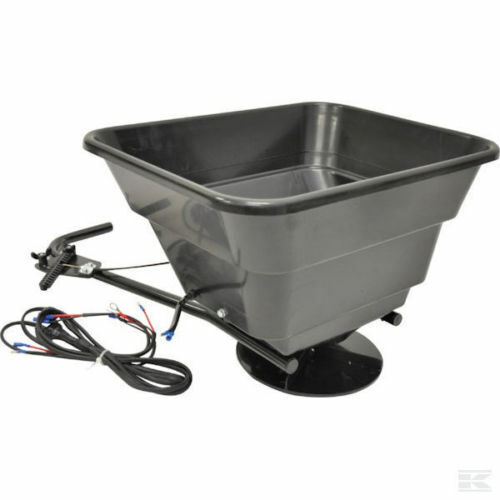
Maintaining your 12V mounted spreader is essential to ensure its longevity and optimal performance. Here are some key maintenance practices:

1\. Clean After Each Use:

Thoroughly clean the spreader after every use to prevent material build up and corrosion. Pay special attention to the spreader vanes, especially when using fertilizers containing sulfur, as they can leave deposits leading to blockages and uneven spreading. Using oil-based lubricants, such as WD-40, can help dissolve sulfur buildup effectively

2\. Lubricate Moving Parts:

Regularly lubricate all moving components, including bearings, chains, conveyors, rollers, and augers, with a high-quality multi-purpose grease or oil. This practice minimizes wear and ensures smooth operation. For electric-powered spreaders, apply dielectric grease to terminals to prevent corrosion and facilitate easy reconnection.

3\. Inspect and Adjust Belts and Chains:

Check the tension of belts, chains, and conveyors periodically. Proper tension reduces slippage and performance issues. Be cautious not to overtighten, as this can strain the motor or gearbox bearings. Always refer to the owner's manual for specific adjustment guidelines.

4\. Inspect the Motor and Electrical Components:

Regularly check electric motors for corrosion and debris, especially around the leads and drive shaft. Keep motors and connectors clean without using water; instead, use steel wool or brushes. For gas-powered spreaders, monitor fluid levels and adhere to maintenance schedules outlined in the owner's manual.

5\. Proper Storage:

After cleaning, store the spreader in a dry area to prevent rust and corrosion. Avoid storing fertilizers in the spreader for extended periods, as residual materials can cause damage. Ensure the spreader is moisture-free before storage.

6\. Refer to the Owner's Manual:

Always consult the manufacturer's manual for detailed maintenance instructions specific to your spreader model. Following the manufacturer's guidelines ensures that you address all necessary maintenance tasks appropriately.

By implementing these maintenance practices, you can enhance the lifespan and efficiency of your 12V mounted spreader.

6. Troubleshooting

  • WHAT DO I DO IF THERE ARE MISSING PARTS FROM MY ORDER?

If there appears to be any part missing from your order, contact our friendly and helpful Customer Support Team within 7 days of receipt.

  • FOR ALL OTHER ISSUES, PLEASE CONTACT OUR CUSTOMER SUPPORT TEAM.
monstershop
monstershop (opens in new tab)Terms (opens in new tab)Privacy (opens in new tab)