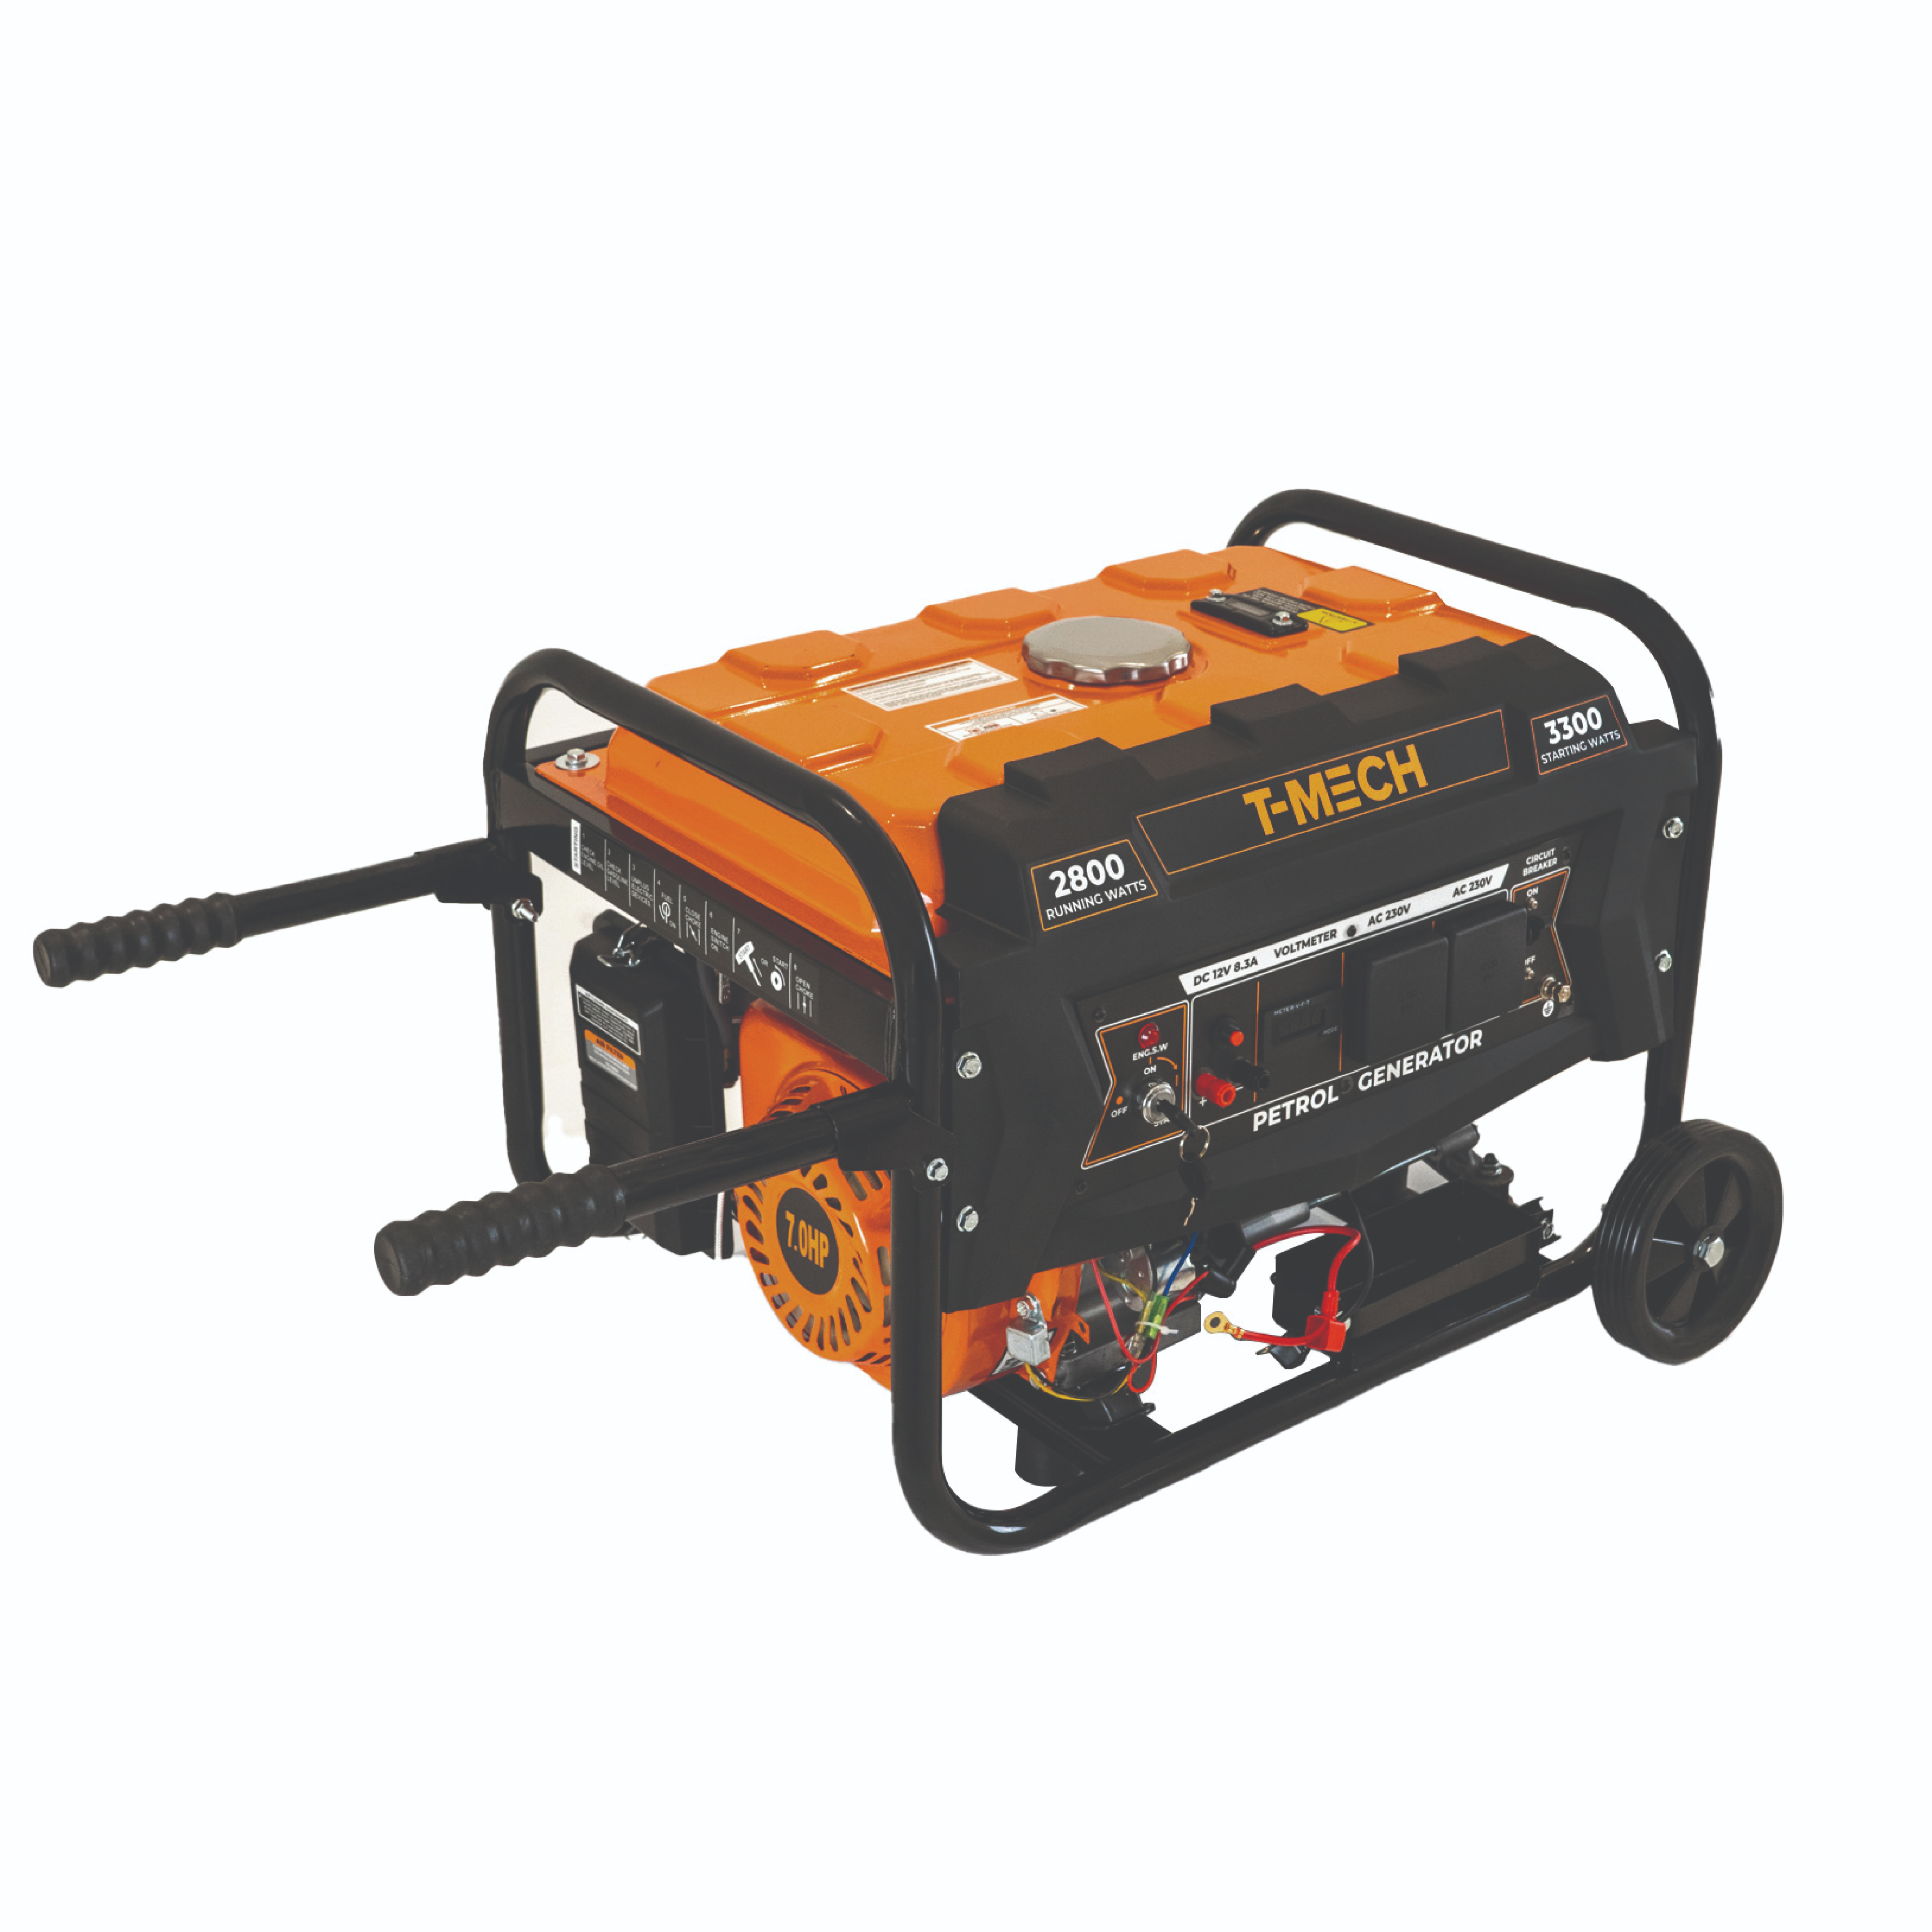
The 7HP Petrol Generator is a robust and reliable power solution, ideal for both home and job site use. Featuring a digital display, it provides easy monitoring of voltage, frequency, and runtime to ensure optimal performance. This generator includes a parts kit with essential tools for basic maintenance. Designed for portability, it comes equipped with sturdy wheels and handles, making it easy to transport and manoeuvre. Combining convenience, durability, and efficiency, this generator is designed to meet all your power needs.
For safety purposes the generator is drained of Fuel and Oil by the factory prior to transport. You will need to add fuel and oil to the generator before using the generator for the first time.
NEW ENGINES
New engines need to break-in. The break in period for these engines is approx. 20 hours. Do not overload the generator during the break-in period, maximum load should be no more than 75% of maximum rated power. Change the oil after 6 hours running or 1 month. Then change the oil after 15 hours for a few times of operating. Thereafter the oil change is required every 100 hours or 3 months.
ADDING FUEL
Only use PETROL fuel. Place the generator on a level surface and unscrew the fuel tank cap. Fill with petrol only up to maximum level mark. Do not overfill the fuel tank.
ADDING OIL
Engine oil is the most important factor in determining engine life. The use of poor-quality oil or not changing the oil regularly can result in the excessive wear on the engine or even the engine seizing up. We recommend the use of SAE 10W.30 grade oil. Place the generator on a level surface. Unscrew oil inlet cap and fill with oil. You can check the oil level using the oil dipstick. Do not force or rotate the dipstick in the engine.
3. Checks before every use
Check the following before each use to ensure the generator is safe to use and to prolong the life of your generator.
LEAKS - Ensure there are no fuel or oil leaks. If you spot any leaks do not use the generator.
FUEL - Ensure you have enough fuel in the fuel tank.
OIL - Check the oil level is within the minimum and maximum markings. The generator has a low oil pressure alarm and engine cut-off. In the event of low oil-pressure the generator will automatically switch off to protect the engine from potential damage. In addition, we do recommend that you regularly check the oil level.
NUTS & BOLTS - Check for loose nuts or bolts and tighten if necessary.
4. Starting the Generator
ELECTRIC STARTING
1. Turn the key to the ‘ON’ position. 2. Put the fuel lever to the ‘ON’ position. 3. Put the choke to the ‘CLOSE’ position. 4. Turn the key to the ‘START’ positition until the engine starts, then release, and it will automatically spring back to the ‘ON’ position. 5. As the engine warms up, put the choke to the ‘OPEN’ position.
PLEASE NOTE: Excessive use of the starter motor will flatten the battery. Always leave the ignition key in the ‘ON’ position while the generator is running.
MANUAL (RECOIL) STARTING
Turn the key to the ‘ON’ position.
Put the fuel lever to the ‘ON’ position.
Put the choke to the ‘CLOSE’ position.
Pull the cord to start the engine.
As the engine warms up, put the choke to the ‘OPEN’ position.
5. Operating Instructions
Always warm up the engine without any load for approx. 3 minutes before attaching any loads.
Check that there no abnormal vibrations or sounds. Check if the engine is misfiring. Check the colour of the exhaust gas – is it too light or too dark? If you notice any of these occurring, then switch off the generator.
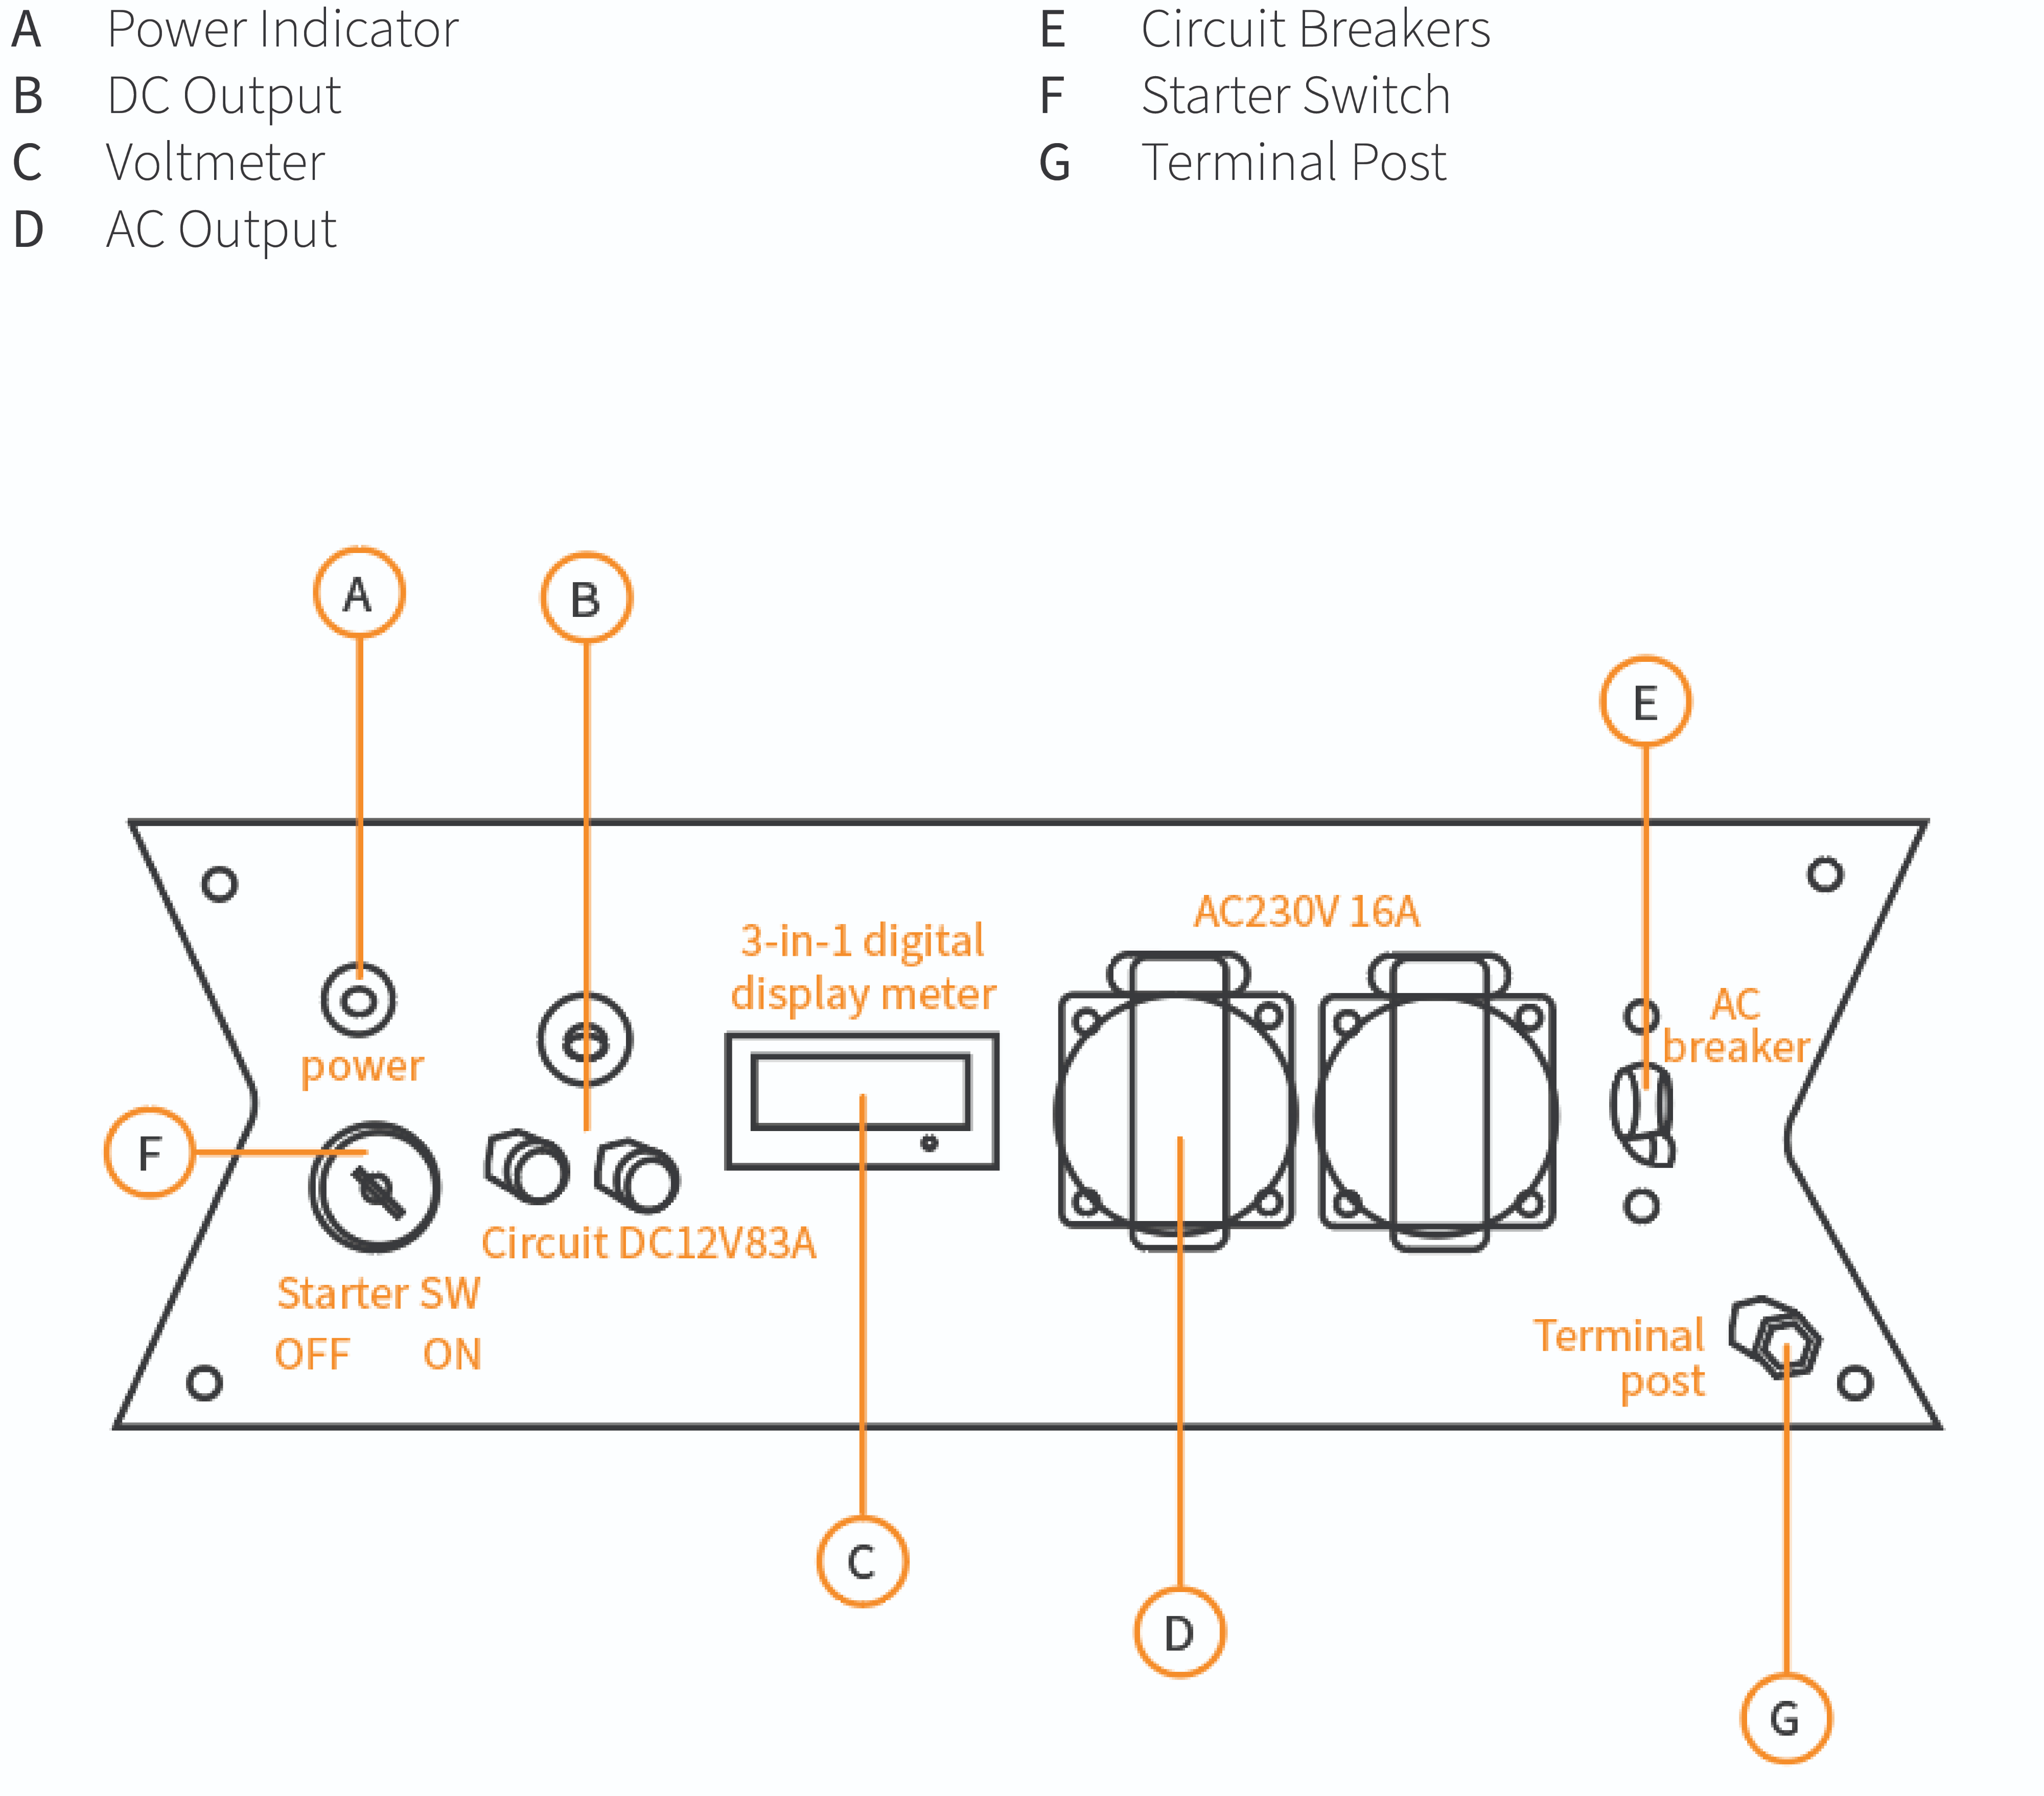
6. AC Operation
1. Increase the speed of the engine to maximum using the engine speed lever 2. Check the voltmeter. Once it points to 230V +/- 5% you can connect an appliance to the generator. 3. When connecting appliances to the generator, always connect the largest load first. 4. If overloading of the generator causes the AC circuit breaker to trip, reduce the load on the circuit.
NOTE: Do not start two connected appliances simultaneously. Start one at a time. If you have connected floodlights to the generator do not connect any other appliances.
7. DC Operation
The DC terminal is only to be used for charging 12V applications.
1. Always disconnect the negative cable (Ground cable) before connecting to the generator 2. Start the generator. 3. Connect the charging cable to the terminals and then to the generator. 4. Once the application is charged always disconnect the cables at the generator first.
NOTE: DO NOT reverse the charging cables as this will damage the generator. Batteries can produce explosive gases while recharging. Charge batteries in a well-ventilated area.
8. Stopping the Generator
1. Reduce the speed of the engine using the engine speed lever to its lowest speed. 2. Allow the engine to run without any load for approx. 3 minutes 3. Set the engine speed lever to ‘STOP’ and the fuel lever to ‘STOP’ 4. Turn the ignition key to the ‘off’ position.
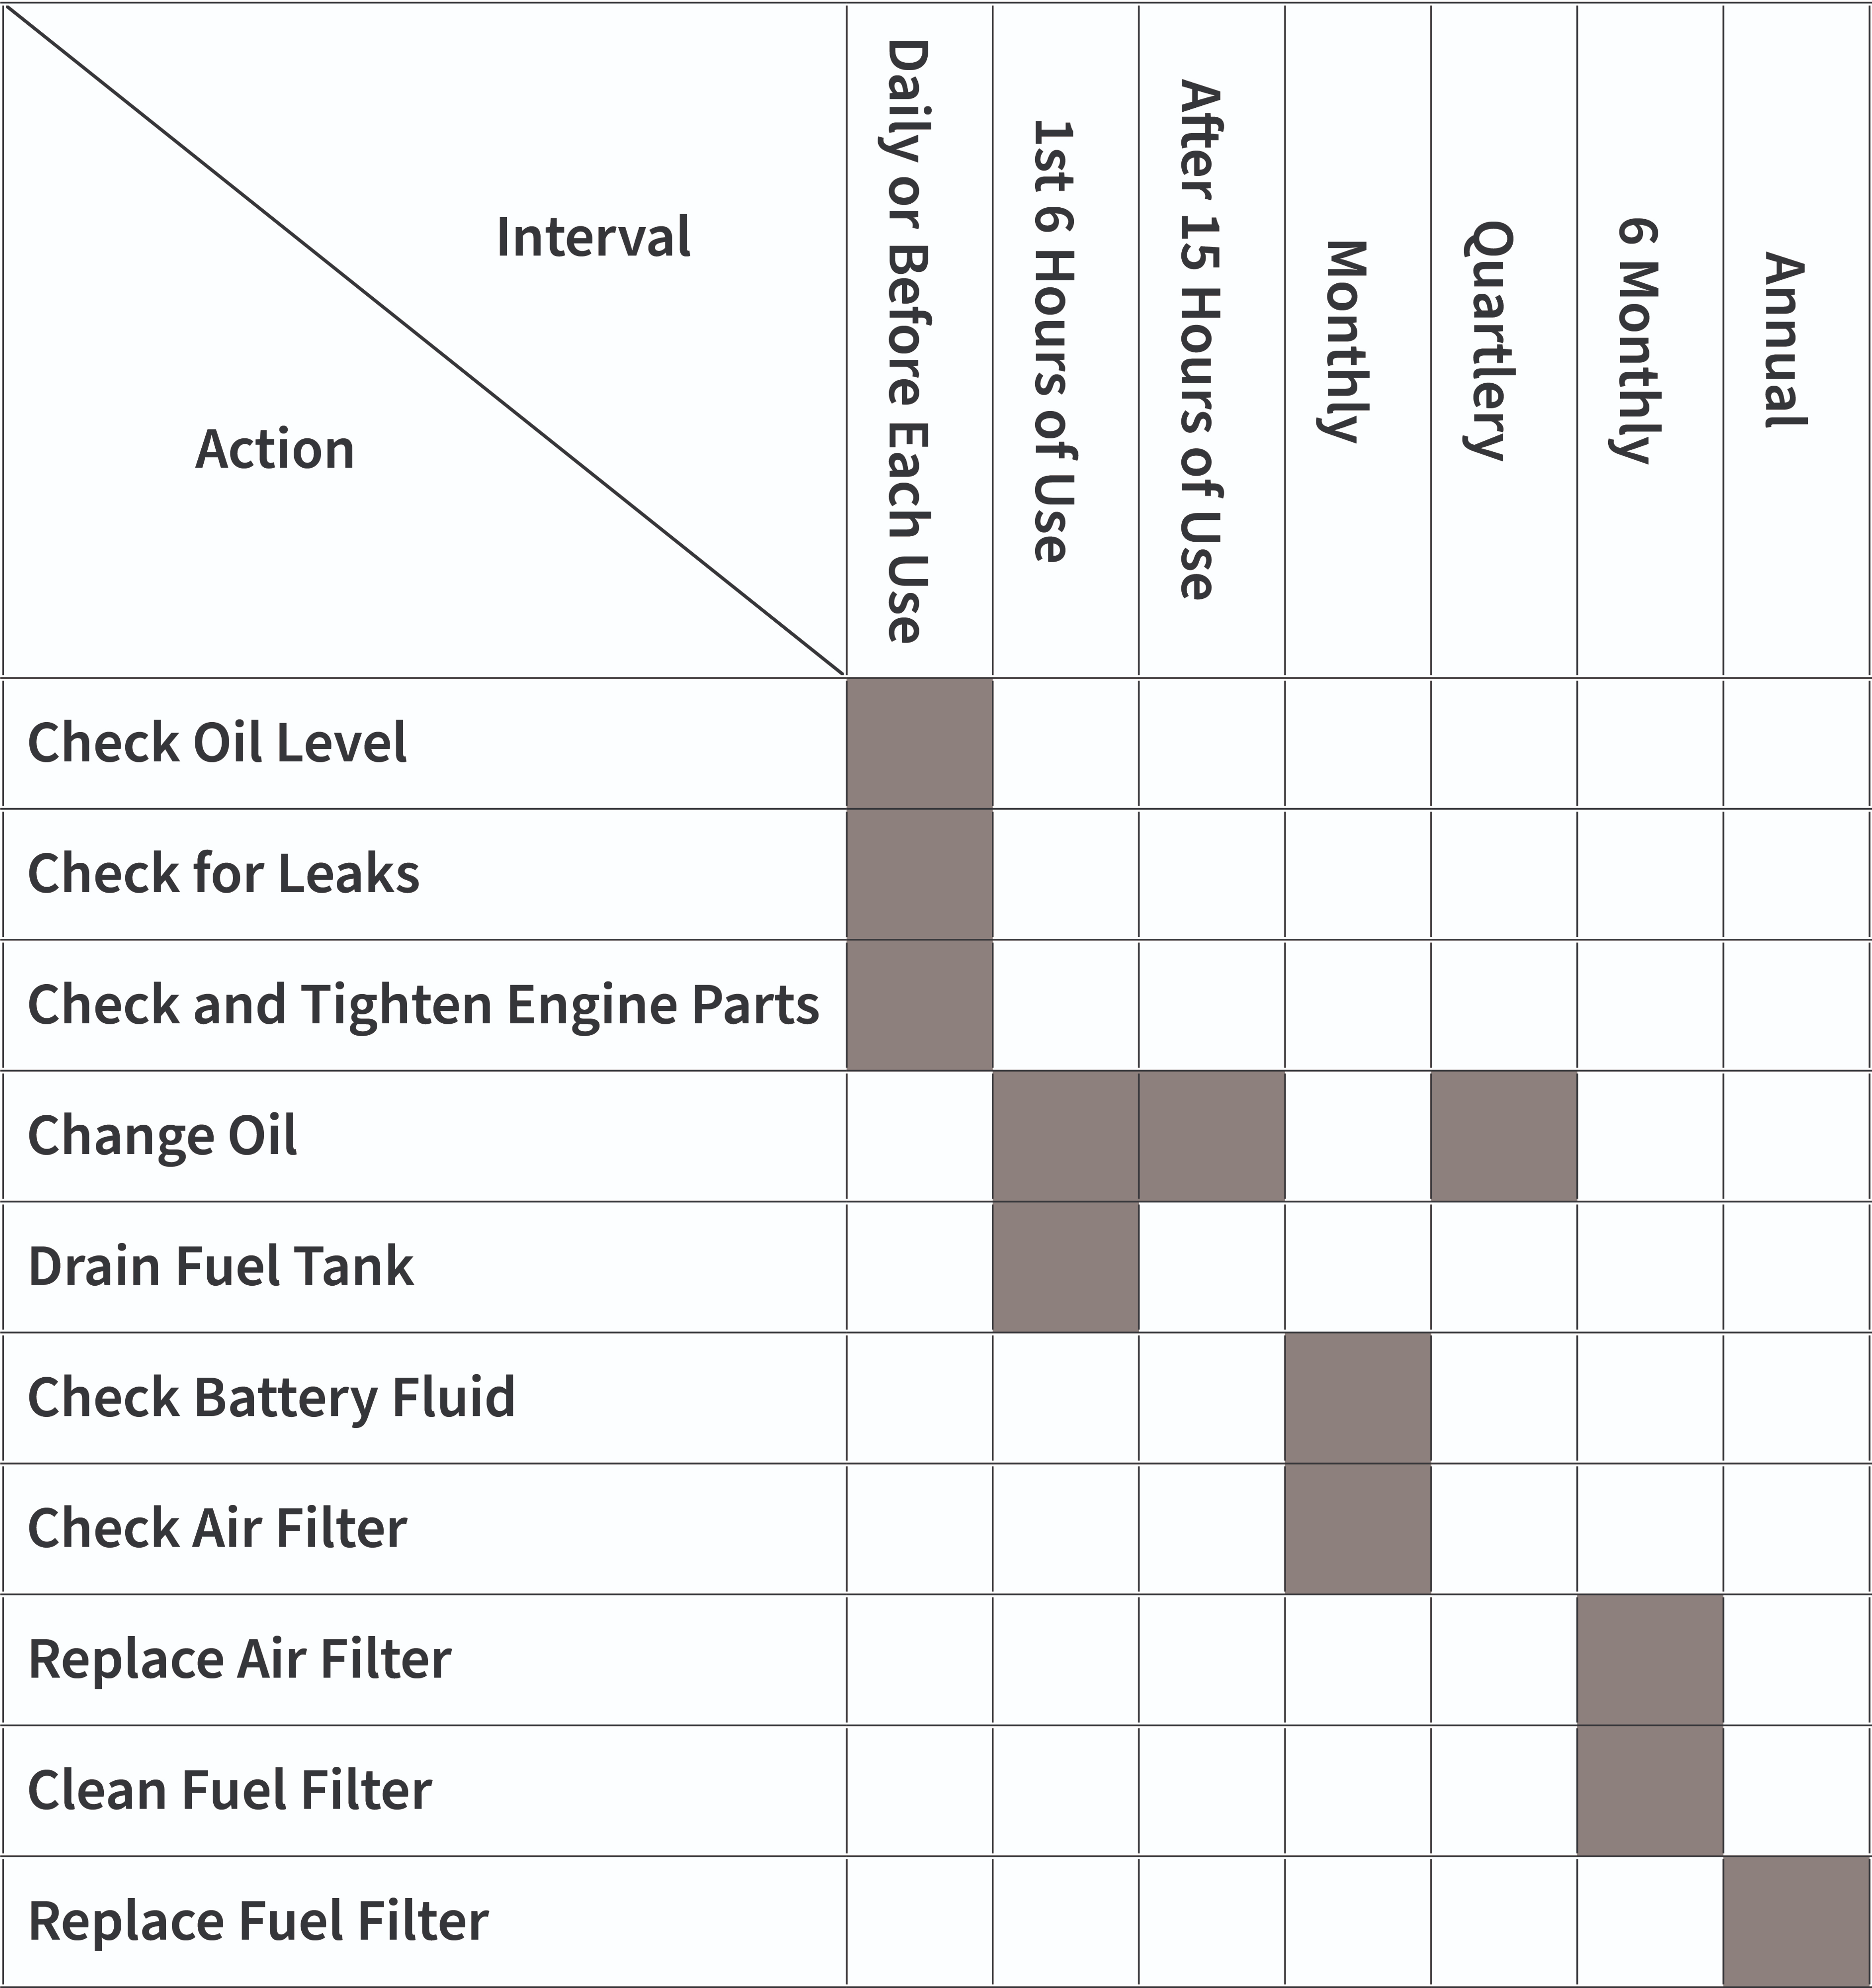
9. Maintenance
Remove the spark plug lead before performing maintenance. If spark plug issues arise then remove and clean. If the problem still persists, replace the spark plug.
CHANGING THE OIL
It is recommended that you change the oil when the engine is still warm as this will allow you to drain all the oil from the engine. Unscrew the oil filler cap. Remove the drain plug and drain the used oil. Replace the drain plug and refill with new oil. Take not to over fill with oil. Use the dipstick to check how much oil is in the engine. We recommend 10W 30 Grade non- or part-synthetic oil.
CHECKING AND CHANGING THE AIR FILTER
To check the air filter, unscrew the wing nut for the air filter cover and remove the cover. Remove the air filter element. Do not use detergent to wash the filter element. Clean with water and allow to completely dry before re-fitting to the engine. The air filter element should be replaced every 6 months. Do not operate the generator without the filter attached as this can damage the engine.
CHECKING THE BATTERY
Check the amount of electrolytic solution in the battery once a month. If the level of electrolytic solution is below the minimum level mark on the battery, then top up with distilled water.
CHANGING THE FUEL FILTER
First drain all the fuel from the fuel tank. Loosen the small screws on the fuel switch and remove the fuel filter from the port. Use petrol fuel to clean the filter. To replace the filter just reverse the step for removing the filter.
10. Troubleshooting
WHAT DO I DO IF THERE ARE MISSING PARTS FROM MY ORDER?
If there appears to be any part missing from your order, contact our friendly and helpful Customer Support Team within 7 days of receipt.
WHY IS THE GENERATOR NOT STARTING?
Check fuel level and re-fuel if required, Check battery is charged and has enough battery acid. If you are still unable to start the generator, contact the Customer Support Team.
WHY ARE MY APPLIANCES NOT GETTING ANY POWER FROM THE GENERATOR?
First check the voltmeter. It should show the voltage to be 230V +/- 10%. Check the load rating of the appliance to make sure it is not rated too high for the generator. If you have more than one appliance connected to the generator, then try un-connecting one of the appliances.
FOR ALL OTHER ISSUES, PLEASE CONTACT OUR CUSTOMER SUPPORT TEAM.