monstershopmonstershop.co.uk
Instructions by monstershopThin Flat & Oval Mirror Radiator
monstershop

Thin Flat & Oval Mirror Radiator

Thin Flat & Oval Mirror Radiator
Before you start
Unit Overview Safety Advice GPSR Information Parts
Steps
Step 1Step 2Step 3Step 4Step 5Step 6Step 7Step 8Step 910. Maintenance11. Troubleshooting

No results

monstershop
monstershop / Thin Flat & Oval Mirror Radiator
Thin Flat & Oval Mirror Radiator
monstershop

Instructions by

monstershop

Thin Flat & Oval Mirror Radiator

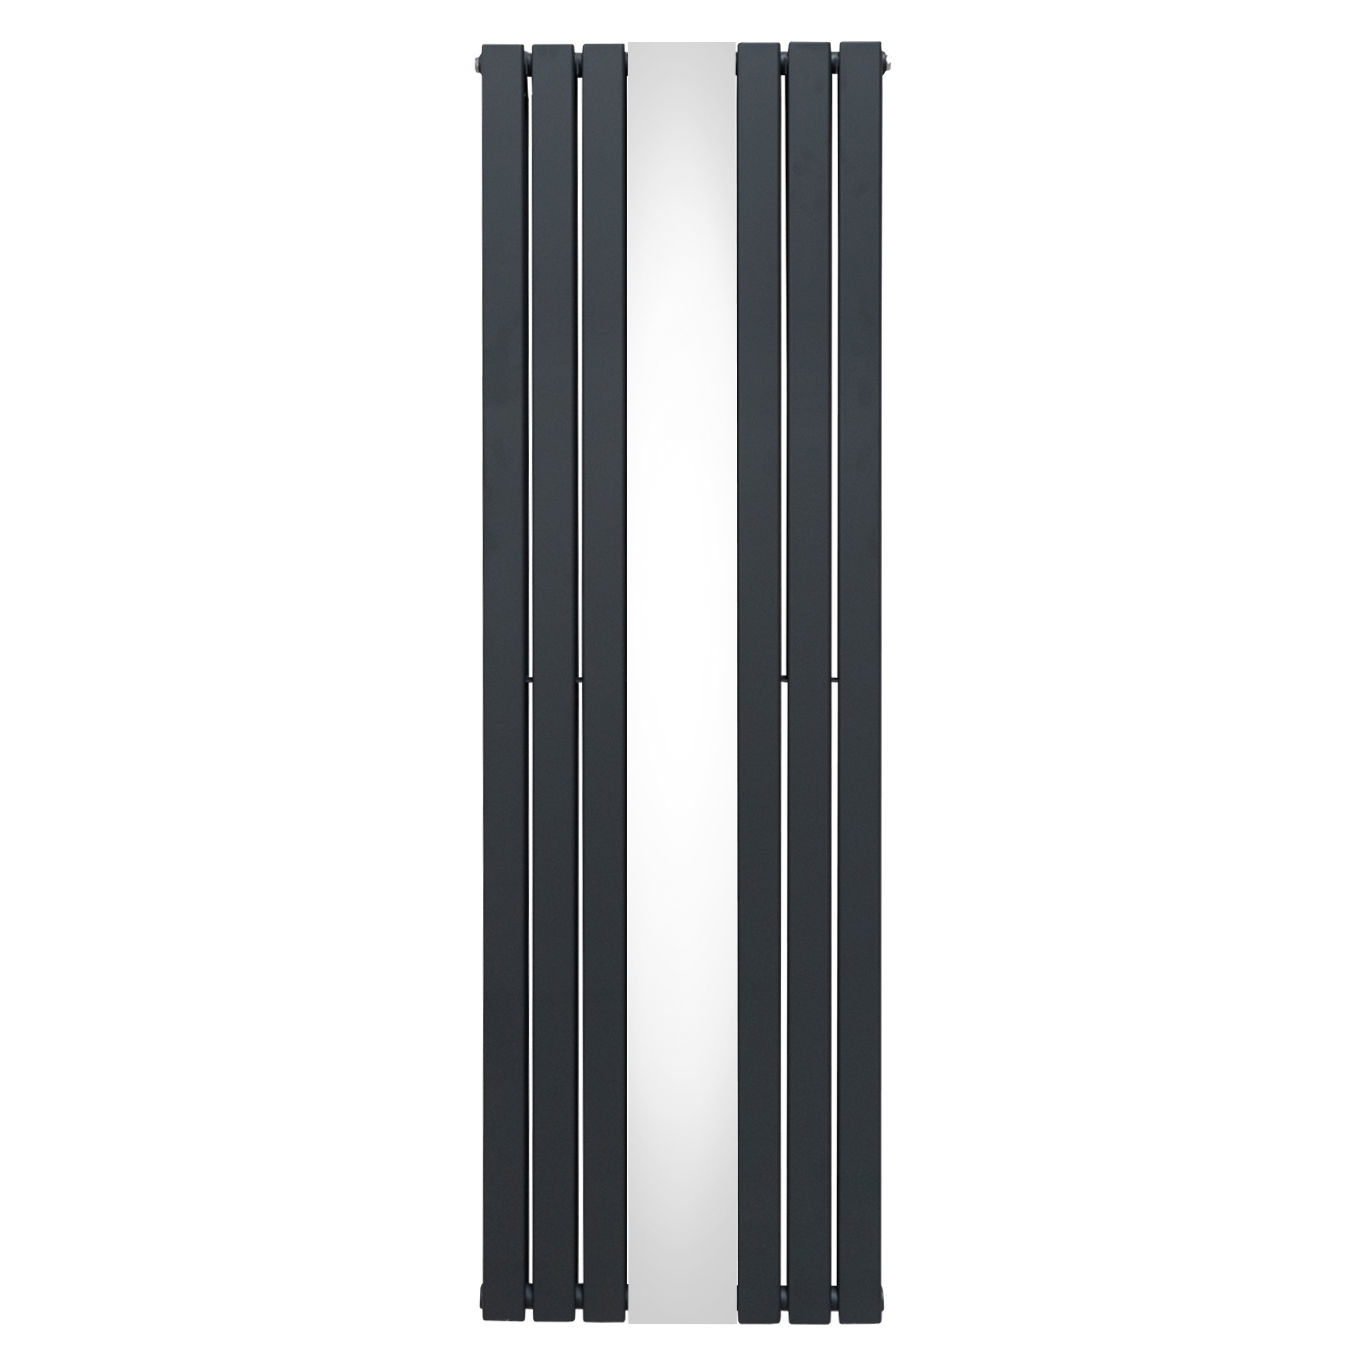
Infuse warmth into your home with our cutting-edge oval panel vertical radiator with a sleek central mirror - a perfect blend of timeless elegance and modern efficiency.

Product Information

Thin Flat & Oval Mirror Radiator

Product Features: * Premium 1.5mm Carbon Steel * Impressive 5009 BTU Heat Output * Secure Brackets and Fixing Kit * Free Flexible Cleaning Brush * 15 Year Quality Guarantee Specifications: * Colour: Black * Material: 1.5mm Carbon Steel * Finish: Triple Layered Powder Coating * Radiator Depth: 78mm / 7.8cm / 3.1” * Depth With Bracket: 103mm / 10.3cm / 4.1” * Individual Tube Size: 50mm / 5cm / 2” * Gap Between Tubes: 9mm / 0.9cm / 0.4” * BTU Rating @ 50: 3944 * BTU Rating @ 60: 5009 * Inlets/Outlets Size: Standard 0.5" BSP Bore * Compatibility: All UK & EU Heating Systems * Testing: BS EN 442 & ISO9001:2015 Standards * CE Certificate: CE & UKCA
SKU
29597,29598,29599,29600,29601,29602,29603,29604,29605,29606,29607,29608,29609,29610,29611,29612,29613,29614,29615,29616,29617,29618,29619,29620,29621,29622,29623,29624,29625,29626,29627,29628,29629,212992,212993,212994,212995,212996,212997,212998,212999,213000,213001,213002,213003,213004,213005,213006,213007,213008,213009,213010,213011,213012,213013,213014,213015,213016,213017,213018,213019,213020,213021,213022,213023,213024,213025,213026,213027,213028,213029,213030,213031,213032,213033,213034,213035,213036,213037,213038,213039,213040,213041,213042,213043,213044,213045
Model RangeDimensions (mm)
29597 - 29599600 x 700
29600 - 29602600 x 910
29603 - 29605600 x 1190
29606 - 29608600 x 1400
29609 - 296111600 x 280
29612 - 296141600 x 420
29615 - 296171600 x 560
29618 - 296201600 x 700
29621 - 296231800 x 280
29624 - 296261800 x 420
29627 - 296291800 x 560
212992 - 2129941800 x 425
212995 - 2129971800 x 565
212998 - 2130001800 x 425
213001 - 2130031800 x 565
213004 - 213006600 x 600
213007 - 213012600 x 780
213013 - 213015600 x 1020
213016 - 213018600 x 1200
213019 - 213021600 x 1440
213022 - 2130241600 x 240
213025 - 2130271600 x 360
213028 - 2130301600 x 480
213031 - 2130331600 x 600
213034 - 2130361800 x 240
213037 - 2130391800 x 360
213040 - 2130421800 x 480
213043 - 2130451800 x 60027.9

GPSR Information

UK

  • Manufacturer: Monster Group UK Limited, Monster House 19-23 Alan Farnaby Way, Industrial Estate Sheriff Hutton, York YO60 6PG
  • Person Responsible: Rana Harvey, Monster Group UK Limited, Monster House 19-23 Alan Farnaby Way, Industrial Estate Sheriff Hutton, York YO60 6PG, England, +441347878880

EU

  • Manufacturer: Monster Group BV, Van Heemskerckweg 28A & B, Venlo 5928LL Netherlands +441347878880
  • Person Responsible: Rana Harvey, Monster Group BV, Van Heemskerckweg 28A & B, Venlo 5928LL, Netherlands, +44134787888

Unit Overview

Our Monster Radiators come in different shapes and sizes to ensure a perfect fit for your home. These radiators will bring a modern twist to any room you place them in, as well as provide all the warmth you require.

Safety Advice

  • Ensure you have read and fully understood the instruction manual and safety advice before using this product.
  • Do not use this product for anything other than its intended purpose.
  • Do not discard the packaging until all included parts are located and confirmed.
  • Inspect the product for signs of damage before installation, and do not attempt to install or use the product if it is damaged.
  • This product is only suitable for use on indirect/sealed central heating systems, including combi boilers. Do not connect this radiator to an open-vented system.
  • This product must be installed by a qualified plumber, central heating engineer, or other fully competent professional in accordance with all relevant building regulations and industry standards.
  • Ensure the heating system is fully drained before installation to prevent water damage and injury.
  • All pipework connections must be securely fitted and checked for leaks before turning the heating system back on.
  • Do not overtighten connections, as this may cause damage to the radiator or pipework.
  • Ensure that the wall and fixings used are capable of safely supporting the full weight of the radiator when filled with water.
  • The fixings provided are only suitable for solid brick walls. For installation on other surfaces, such as plasterboard or stud walls, ensure appropriate fixings and reinforcements are used to prevent failure.
  • Do not install this radiator near combustible materials, electrical outlets, or other heat-sensitive items.
  • Allow adequate space around the radiator to ensure proper heat distribution and prevent overheating of nearby objects.
  • Ensure appropriate personal protective equipment (PPE), such as gloves and safety glasses, is worn when handling or installing this product.
  • Aluminium radiators can become extremely hot during use. Avoid direct contact with the surface when in operation to prevent burns.
  • Do not cover or obstruct the radiator, as this may lead to overheating and reduce its efficiency.
  • Regularly inspect the radiator, pipework, and valves for any signs of leaks, corrosion, or damage. Any issues should be addressed by a qualified professional.
  • If the radiator requires bleeding, follow the manufacturer’s instructions carefully and use the correct tools to avoid damaging the valve.
  • Ensure the system pressure is maintained within the recommended range as specified by the boiler manufacturer.
  • Do not use chemical cleaners or descalers that are not explicitly approved for use with aluminium radiators, as incompatible substances may cause internal damage or corrosion.
  • If the radiator is being removed or replaced, ensure the heating system is properly drained to prevent water damage.
  • In the event of a suspected leak, immediately turn off the heating system and consult a professional.
  • Do not modify the radiator, pipework, or mounting brackets, as this may compromise safety and void any warranty.
  • Keep children and vulnerable individuals away from the radiator, especially when it is in use, to prevent accidental burns or injury.
  • If the radiator will not be used for an extended period, ensure the heating system is properly maintained to prevent corrosion and system failures.

GPSR Information

UK

  • Manufacturer: Monster Group UK Limited, Monster House 19-23 Alan Farnaby Way, Industrial Estate Sheriff Hutton, York YO60 6PG, England.
  • Person Responsible: Rana Harvey, Monster Group UK Limited, Monster House 19-23 Alan Farnaby Way, Industrial Estate Sheriff Hutton, York YO60 6PG, England. +441347878880

EU

  • Manufacturer: Monster Group BV, Van Heemskerckweg 28A & B, Venlo 5928LL Netherlands.
  • Person Responsible: Rana Harvey, Monster Group BV, Van Heemskerckweg 28A & B, Venlo 5928LL, Netherlands. +441347878880

Parts

Radiator
Brackets
Screws
Wall Plugs

1.

Ensure you have all the parts needed to attach the radiator to the wall. Allow a qualified professional to install the radiator.

2.

Start by placing one top bracket on the wall where you would like to have the radiator fitted. Use a pen to mark the wall for drilling.

3.

Do the same for the rest of the brackets and ensure all of them are straight and aligned with the radiator pipes.
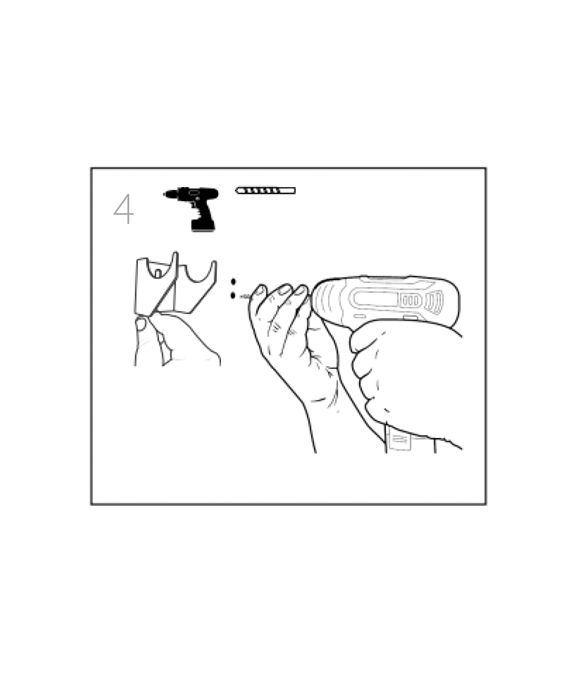
4.

Use a drill with a 10mm bit to drill the holes for the brackets.
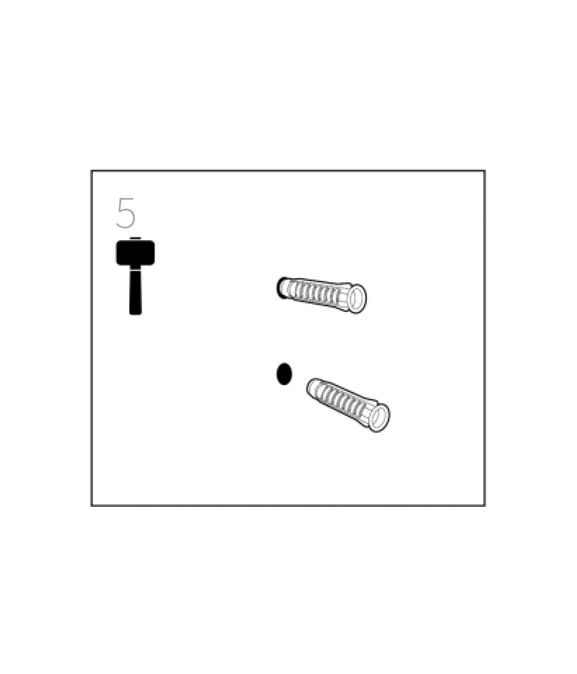
5.

Place the wall plugs into each drilled hole. Use a rubber mallet if this process is too difficult by hand.
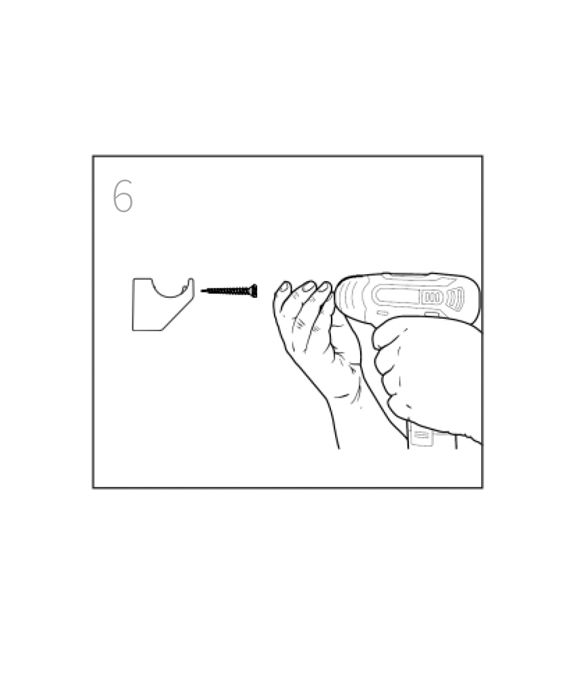
6.

To secure each bracket onto the wall, screw the nails into the wall plugs.

7.

Place the radiator on the top brackets, and secure the radiator on the bottom brackets as well. Use a spirit level to ensure the radiator has been correctly attached to the wall.

8.

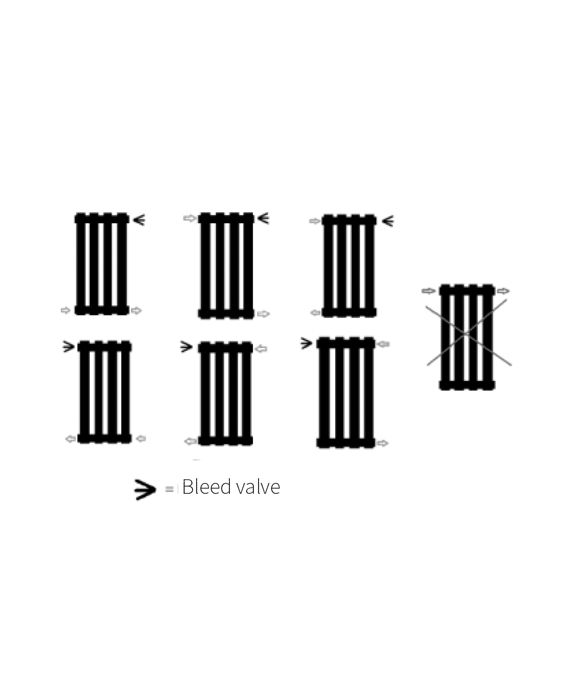
Please ensure the valves are fitted as per the diagrams.

9.

Ensure that a bleed point always remains at the top of the unit. If connecting both feeds to the bottom, it is recommended that a baffle is used. The red cap on the radiator indicates where the flow should come in. Use a wrench to fit the radiator caps on each end.

10. Maintenance

  • This product can only be used at PN 1MPa (10g/cm2 , 10 Bar). It should only be filled with water, and at a temperature below 100°C (212°F). 
  • If the temperature exceeds 48°C (or 120°F), please provide a warning sign near the product to avoid accidental burning. 

To ensure you can enjoy your radiator for as long as possible, it is essential you first flush your heating system with a central heating cleanser, this will clear any waste from the system. Following the cleansing of the system you must protect the system with a central heating inhibitor. These two simple steps will greatly increase the efficiency and lifespan of your central heating system. Failure to complete these steps increases the chances of pinhole leaks, and will also invalidate the guarantee on your radiator.

11. Troubleshooting

WHAT DO I DO IF THERE ARE MISSING PARTS FROM MY ORDER?

If there appears to be any part missing from your order, contact our friendly and helpful Customer Support Team within 7 days of receipt.

monstershop
monstershop (opens in new tab)Terms (opens in new tab)Privacy (opens in new tab)